White Tulip Designs » Inspiration, Design, and DIY for all of life's events.

Masthead header

Spice Labels


Spice Labels - White Tulip Designs


*This post contains affiliate links. However, all opinions presented are my own.

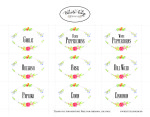
Ok, so word is, you all enjoyed my sweet little spice shelves from Monday’s post so hopefully this will be a welcome follow-up. In an effort to continue adding a little dashes of bright color throughout my kitchen I created a collection of labels for my nice new spice bottles. The artwork is my own watercolor work created just for these labels.


Printable Spice Labels from White Tulip Designs


1. Print the included PDF pages. I printed mine on plain copy paper and attached them with clear packing tape. However you might also consider using white label paper (see here)  There are 5 pages, 4 are filled out with popular spices and one is blank. (I used the font Ayres to fill in my labels. (Download Ayres free here!)


Printable Spice Labels from White Tulip Designs


2. Cut along the dotted lines. These are set up to be cut by hand or using a guillotine, whichever you have on hand.

Printable Spice Labels from White Tulip Designs


3. If you’re using the packing tape to attach your labels you’ll want to note that the labels are roughly the same width. Start by pulling out a length of tape about 4 inches long, without tearing it off. Moving from one side to the other, with the label facing down, press the label onto the tape. This will help keep out wrinkles and bubbles. If you lay your bottles on their side and then apply the labels one by one you can be sure each one is placed properly.


Printable Spice Labels from White Tulip Designs      Printable Spice Labels from White Tulip Designs

 Now you can fill your bottles and put them on your shelf!

Printable Spice Labels -White Tulip Designs


You’re welcome to print as many of these and as often as you’d like. Feel free to use them in a housewarming gift or however you choose. But please remember these are free for personal use only. All copyright of artwork and text layout remains with White Tulip Designs.

Buy bottles here: Spice bottles

Click the picture below:

Click Here!

*If you missed it, here are the details on my handy spice storage shelves!


I’m linking up over at Wow Us Wednesday, Metamorphosis Monday, The Scoop !

[…] 出典: www.whitetulipdesigns.com […]

Jennifer (White Tulip Designs) - 03/03/2017 - 1:18 pm

Hi Carol,
Thanks for stopping by! I didn’t set them up to fit a specific label size. However, you can use full-sheet sized labels in place of the plain paper. I love the full sheet size since you can usually purchase it a bit cheaper and get lots of different uses out of it. (Click here for some options!) Be sure you check to make sure what type of labels work best with your printer.

Carol - 02/28/2017 - 2:05 am

I just found your labels. I have printed them out on plain paper and they are lovely. Do you know what Avery label # if I wanted them on labels?

Best of 2015 » White Tulip Designs - 01/01/2016 - 10:24 am

[…] 9. Spice Labels […]

[…] Spice Rack / Printable Labels […]

Jennifer (White Tulip Designs) - 08/11/2015 - 8:08 am

Thank you!

Lou Lou Girls - 08/10/2015 - 12:53 pm

This looks so amazing. Pinned and tweeted. Thank you for bringing such amazing creations to our party. We hope to see you tonight at 7 pm because we LOVE to party with you! Lou Lou Girls

Jennifer (White Tulip Designs) - 05/24/2015 - 10:50 am

Thank you Trish!

Trish - 05/24/2015 - 3:28 am

The labels are so cute. I love them. I also love the spice bottles.

Jennifer (White Tulip Studio) - 04/29/2015 - 9:38 am

Thank you Jes!! Don’t forget to check and see the printables I’m working on for Mother’s Day!

JES - 04/29/2015 - 6:48 am

Your spice labels are lovely! I have made some in the past but your artwork makes it more beautiful! I found you via Wow Us Wednesdays. Have a lovely week 🙂

Jennifer (White Tulip Studio) - 04/05/2015 - 5:21 pm

Hi Bobbie, Thanks for the message. You need to click the small thumbnail picture just above the text to get it to open.

bobbie g - 04/05/2015 - 11:45 am

labels do not come up when you select click here

[…] For printable Spice Labels click here! […]

Spice Rack DIY

Here’s a quick kitchen Spice-Up!

Starting with a sweet little spice rack idea. I’ve been wanting one for a while. Sadly, I’ve been stashing my spices in a small box on the bottom shelf of my rolling “island” until I could figure something out. Well, when I was working on my magazine-rack project I worked out a plan to build my spice rack along the side of the upper cabinets. Perfect! They are out of direct sunlight, but still easy to get to.


Spice Rack - White Tulip Designs


I knew I wanted something simple that would blend in to the decor/layout of the kitchen pretty seamlessly. So I created shelves that had a platform attached to a brace piece with trim around the outside to keep my jars from sliding off.


Spice Rack - White Tulip Designs             Spice Rack - White Tulip Designs


I used a hand-held staple gun (Craftsman) to nail the shelves together. I’ve had my staple gun for years and I use it quiet often! For this project I used simple brad nails. The shelves are pre-painted the pieces white to make sure I had covered all the little nooks and crannies. At this point, I measured the height of my bottles (more about those later) and marked how far part the shelves should be placed. Then, I screwed each shelf to the side of my cabinet (check with a level first), through the brace, in two places.

Spice Rack -White Tulip Designs


After they were all in place, I wiped them down and painted over everything in the same white paint (Valspar - Bistro White) I had used for the cabinets.


Spice Rack - White Tulip Designs


After visiting a fantastic spice shop on a day trip to Charlotte, NC (Savory Spice Shop) and collecting fun new spices to try I bought a new set of glass spice jars (see below) and I am so excited to finally be able to fill them up and use them! If you live in an area that is close to any of thier locations, I highly recommend stopping in. They are locally owned and I had the most wonderful time perusing the shelves while one of the owners answered my questions and taught me some new tricks for using exotic spices.

Stay tuned this week as I will be offering a free spice label printable and tutorial!

Thanks for stopping by! I look forward to seeing you again soon!

Custom Spice Rack from White Tulip Designs


 *Please note, this post does include affiliate links. However, the opinions included are my own.

For printable Spice Labels click here! Or, would you like to see the Kitchen tour before - click here?

I’m linking up over at: RemodelaholicThe Scoop, Metamorphosis Monday , Your Turn To ShineWow Us Wednesday

[…] DIY Spice Rack†from whitetulipdesigns.com […]

[…] The unused end of a row of upper cabinets is a great spot for a smart, space-saving spice rack. Get the tutorial here. […]

[…] Tutorial via whitetulipdesigns.com […]

[…] DIY Spice Rack @ White Tulip Designs […]

Best of 2015 » White Tulip Designs - 01/01/2016 - 10:24 am

[…] 2. Spice Rack DIY […]

Jennifer (White Tulip Designs) - 10/29/2015 - 10:16 am

Thank you Mary!

Jennifer (White Tulip Designs) - 10/29/2015 - 9:36 am

Thank you Sharilee, I’m so glad you stopped by!

Mary-In the boondocks - 10/28/2015 - 6:11 pm

What a great idea. Very smart and practical to find a place for them over there. And they will be easy to get to also for cooking.

Sharilee - 10/28/2015 - 10:36 am

I love that the spices/oils no longer take up cupboard space, which in my kitchen is very precious. The glass containers and labels make these necessities, art. Well done!

[…] Spice Rack / Printable Labels […]

Jennifer (White Tulip Designs) - 07/16/2015 - 9:23 am

Thanks!

Zircon Interior - 07/16/2015 - 1:47 am

Hey Jennifer, Your spice rack is stylish and you can put some bottles on it. Its great idea and thanks for sharing it with us.

Wasted Spaces » White Tulip Designs - 07/12/2015 - 12:46 pm

[…] you’re here don’t forget to check out my built-in spice rack, cabinet organization or take a tour of the whole […]

Jennifer (White Tulip Designs) - 06/01/2015 - 10:10 pm

Thank you for stopping by!

Angela McKinney - 06/01/2015 - 7:42 pm

I hate living in a rented apartment because I would love to do this but cant here. Glad you shared at #HomeMattersParty

Jennifer (White Tulip Studio) - 04/29/2015 - 9:35 am

I love Charlotte! We’re about 2 hours away so it makes for a nice day trip. (Thanks!)

Lauren @BlesserHouse - 04/28/2015 - 10:59 pm

WHAT!? You were in Charlotte? That’s where I am! This turned out so so cute. I love the little spice jars you found. Thanks so much for linking up!

Lou Lou Girls - 04/27/2015 - 2:23 pm

This looks so incredible! I’m always so amazed by your talent. Pinned and tweeted. Please join us on Monday at 7 pm and party with us! It is so super fun to see what you have been working on! Lou Lou Girls

Jennifer (White Tulip Studio) - 04/13/2015 - 10:44 pm

Thank you!

Stella Lee@ Purfylle - 04/13/2015 - 10:23 pm

I’m a little bit in love with your white paint. It makes your spice rack look so clean and bright.

Jennifer (White Tulip Studio) - 04/13/2015 - 8:47 pm

Thank you!

Vicki and Jennifer 2 Bees in a Pod - 04/13/2015 - 7:42 pm

Jennifer - once again - we are amazed at your creativity and talent! Love your new spice rack…the bottles are so pretty! Thanks for sharing with us at Something To Talk About Link Party! Our readers are in for a treat 🙂

Spice Labels » White Tulip Designs - 04/01/2015 - 12:56 pm

[…] you missed it, here are the details on my handy spice storage shelves! […]

Jennifer (White Tulip Studio) - 03/31/2015 - 9:00 pm

Thank you!

Katherines Corner - 03/31/2015 - 12:25 pm

love it! Such a practical diy I always appreciate having my spices close at hand too. Hugs

Opening A Window

Pinterest Project!

Today I wanted to feature a project that I found on Pinterest. Since, like most of us, I have a Pinterest project list a mile long I want to inspire you to get going on some of those amazing projects!


Window details


When I started my new kitchen, I promised I would put myself on Pinterest restriction until the contractor was done. I had carefully planned every space and had created a project list, drawn plans, collected materials and fixtures, and felt like the entire project was well in hand. Except . . . our sad little window over the sink. I just didn’t know what it needed or what to do about it so I figured I’d just have him paint the trim and be done with it.

However, it kept bugging me to think of leaving it as it was. So, I broke my promise about 2 weeks in and was tinkering around on Pinterest on a Sunday afternoon. I found this amazing post from a blogger, Funky Junk Interiors, and knew it would solve my design problem. My window wouldn’t quite fit the plans she had in her tutorial but her directions are so clear I was easily able to edit and make it work for me.

Here’s the original (click for link):

From Donna’s directions, I measured the window (without trim) and using her materials list as a guide, I sketched out a plan for how to layout my boards. Be sure to keep in mind the area of the wall around the window as well as lighting, cabinets, any artwork you plan to hang, etc.


Sink


We nailed everything in to place and then painted it out afterwards. I actually ended up adding the last level (on top) to continue the line of the base of the soffit all around the room.  Here’s a detail pic:


Sink-light

It was the perfect finishing touch. And the project is genius because there are no tricky mitered corners, it’s all just stacked wood! I’m planning to start pulling down the trim room by room and replacing with this system. This should be a great project from G and me to take on this summer. (Shhhh, don’t tell him!)

I got so excited when I started when I started my blog that I put a comment on the Funky Junk’s window post and she sent the sweetest message back. It’s so wonderful to know that there is a huge network of people out there quietly doing good and lifting each other up through the internet.

So, back to my window project. See how pretty it is, and how well it all fits together. It is the crown jewel of the whole kitchen! Who would have ever thought that a 10 minute foray into Pinterest could have started all that?

I owe Donna a huge thank you for saving my kitchen reno. Do you have a home project that you were able to complete thanks to an unknown blogger? A last minute idea that saved the day? Or, do you have a go-to blog that you turn to for help when taking on a design dilemma? Please share we’d all love to know!

Don’t forget to check out the original Funky Junk project before you go!

Thank you for stopping by today! I’m so glad to have you.


Produce bag

A while back I created a set of sturdy and cute little shopping bags to take help reduce the number of plastic bags in our house. It was a bit of an adventure but they did turn out quite nicely, if I may say so myself. (see previous post here) However, I was afraid that including a tutorial might result in tears, mostly from me.

Since then I’ve gotten some of the sweetest comments and compliments from the kind folks at my grocery store. But I still keep ending up with tons of plastic bags we’ll never be able to re-use. So, this weekend I whipped up a new one that’s specifically made to hold produce.

When I was poking around all over the net looking bags in general I kept finding cute t-shirt bags. I couldn’t find a tutorial that looked quite like what I had in mind so I decided to plunge in an make my own.  And it worked!!


DIY market tote from White Tulip Designs


Supplies:

  • T-shirt
  • Scrap fabric
  • Ribbon (I suggest grosgrain or cotton)

I started with a barely worn, heavy weight t-shirt from the thrift store and some left-over fabric from the other bags.

Trim the top off the t-shirt by cutting a straight line from the middle of one sleeve to the other. Using a straight line at an angle, cut the remaining of the sleeve away from the body of the t-shirt.


Market tote     Market tote


Measure 2 panels of fabric, 5inches by the width of the t-shirt (the top area where you cut off the neck). Sew panels (right side facing) to the top/cut portion of the t-shirt.


Bag - 6    Bag - 7


Sew down the “V” on either side of the tote. Then, fold over the top edge of the fabric about an inch and sew down with a straight stitch. I ironed mine down before pinning to keep it straight.

Cut 2 small slits about 1/2 inch apart, in the bottom hem of the t-shirt.  Now, cut a strip from the remaining top portion of the t-shirt and thread it all the way through the bottom hem.  Tie the strip together in a tight knot and cut the remaining ribbons to tuck the knot into the t-shirt.


Bag - 5   Bag - 4


Measure 2 pieces of ribbon measuring twice as wide as the bag plus about 6-8 inches. Thread each ribbon through one side of the top then back through the other being sure to thread each piece in opposite directions.  Tie each ribbon and sew it down to keep it from pulling apart.


Bag - 3    Bag - 2


The perfect addition to my little collection! I can’t wait to use it!


DIY market tote from White Tulip Designs


Here’s the first diy tote post!


 Linking up at Met Monday,


Jennifer (White Tulip Studio) - 04/16/2015 - 8:08 am

Thank you ladies!

Vicki and Jennifer 2 Bees in a Pod - 04/16/2015 - 7:50 am

Hey Jennifer - We forgot to let you know how much we LOVE your DIY Market Tote. We’ve bookmarked this to try making some for ourselves! You’re so creative and energetic. We’ve just Pinned this to our link party board! Great job!

Lou Lou Girls - 04/03/2015 - 3:16 pm

This looks amazing! You are so talented. Pinned and tweeted. Thanks for being a part of our party. I hope to see you on Monday at 7 pm. Happy Easter! Lou Lou Girls

Jennifer (White Tulip Studio) - 03/31/2015 - 8:25 am

Thank you Pamela! I love using these. It’s amazing how much easier it is unloading the groceries too!

Pamela Smith - 03/30/2015 - 11:59 pm

Great idea! I love using the cloth bags. They are so much niver than all that plastic. They hold more and stand up better in the car. Thanks for the tutorial so I can make some of my own. I am visiting from LouLou Girls.

Spring is Here!

Yeah! Spring is here! Ok, well, sort of. Folks in some parts of the country are still neck deep in winter/hell but at least the calendar says it’s Spring. I’ve had enough of all the rain and chilly weather, YUCK! So, I’m celebrating Spring anyway! To welcome the new season I’m including  free downloadable wallpapers for your phone, tablet, or computer.
Spring 2015 Wallpapers

I created this watercolor pretty and pink, posies pattern a while back and am excited to share it here!

Simply download this file onto your computer/phone/tablet, extract the enclosed Jpegs, and upload as your digital wallpaper! I hope you enjoy it as much as I do.  Being the only girl surrounded by 2 boys I like to add a little pink where I can to brighten things up.

Download your wallpapers HERE!


Also, this week, I’ve been working on new artwork to add to my shop. Stop by and take a look at the prints available now. (More items coming soon!)


Robins Eggs


Thanks for stopping by! Have a great weekend!


D I Y   S h o p