White Tulip Designs » Inspiration, Design, and DIY for all of life's events.

Masthead header

DIY Doorknob Backplate

When we were working on the kitchen, I wanted our pantry doors to be more like French doors. So, our contractor took a bi-fold door kit that matched our other interior doors and used it to create my cute little French pantry doors. I chose some small but classic looking crystal knobs but they just needed something to highlight them. I considered painting the backs but didn’t think I’d like the look at all. Since I’ve been going for a cottage chic look I looked into adding backplates to the doors. First of all they are pretty pricey and then, I had a nearly impossible time finding something that was small enough to fit the area they fit into.

Most of what I found was something like this:

51CVHd2AJYL

They are lovely but a bit more to tackle than I wanted. So, I pulled out my sketchbook and some medium gray card stock and got to work. After much surfing around for inspiration and ideas I drew the shape I wanted as well as the beginning details onto tracing paper.

Backplate sketch- White Tulip DesignsOnce I had it like I wanted, I used that as a guide to draw out (in pencil) to matching ones on the gray cardstock. Then, I traced over everything in black Micron pen and then went back over them until I felt the line weights would really show.

Backplate- White Tulip Designs                                 Backplate with tape- White Tulip Designs

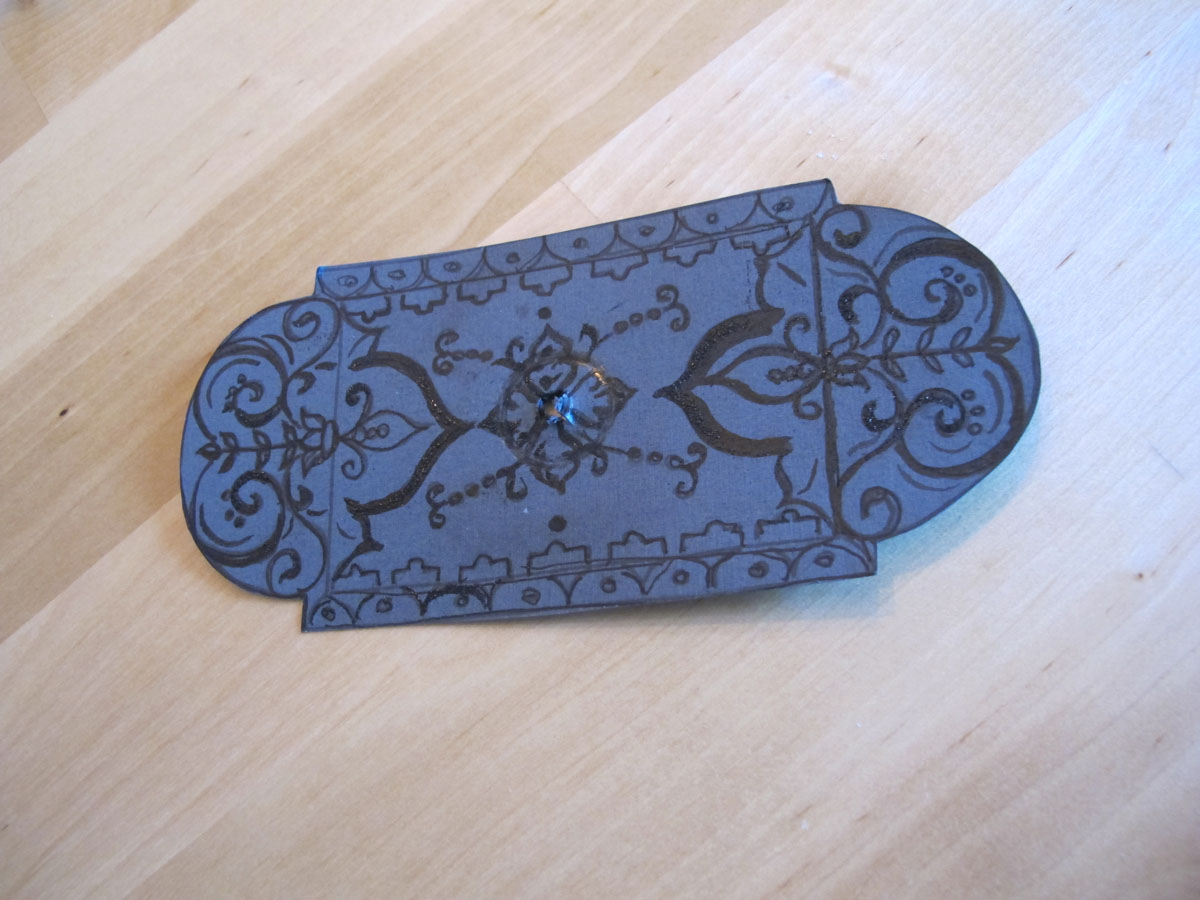
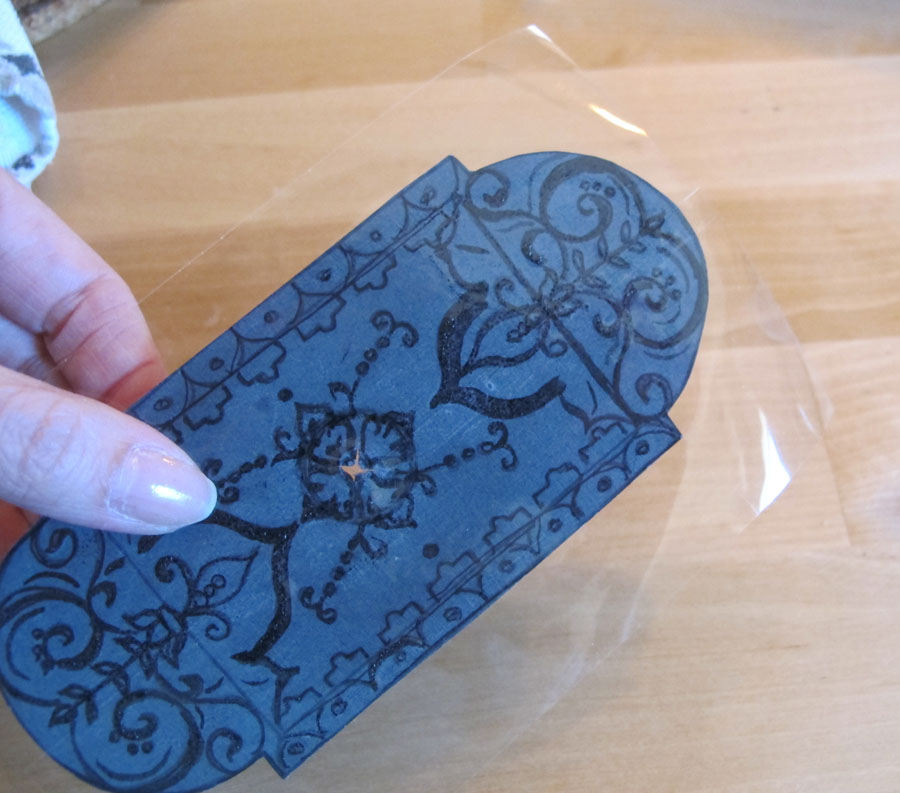
I cut out the final pieces, cut a small hole in the center, then screwed them onto the doors using the knobs to hold them in place. Everything looked balanced and well spaced so I took them back off again and layered clear packing tape over the front to seal in the edges.

Backplate detail- White Tulip Designs
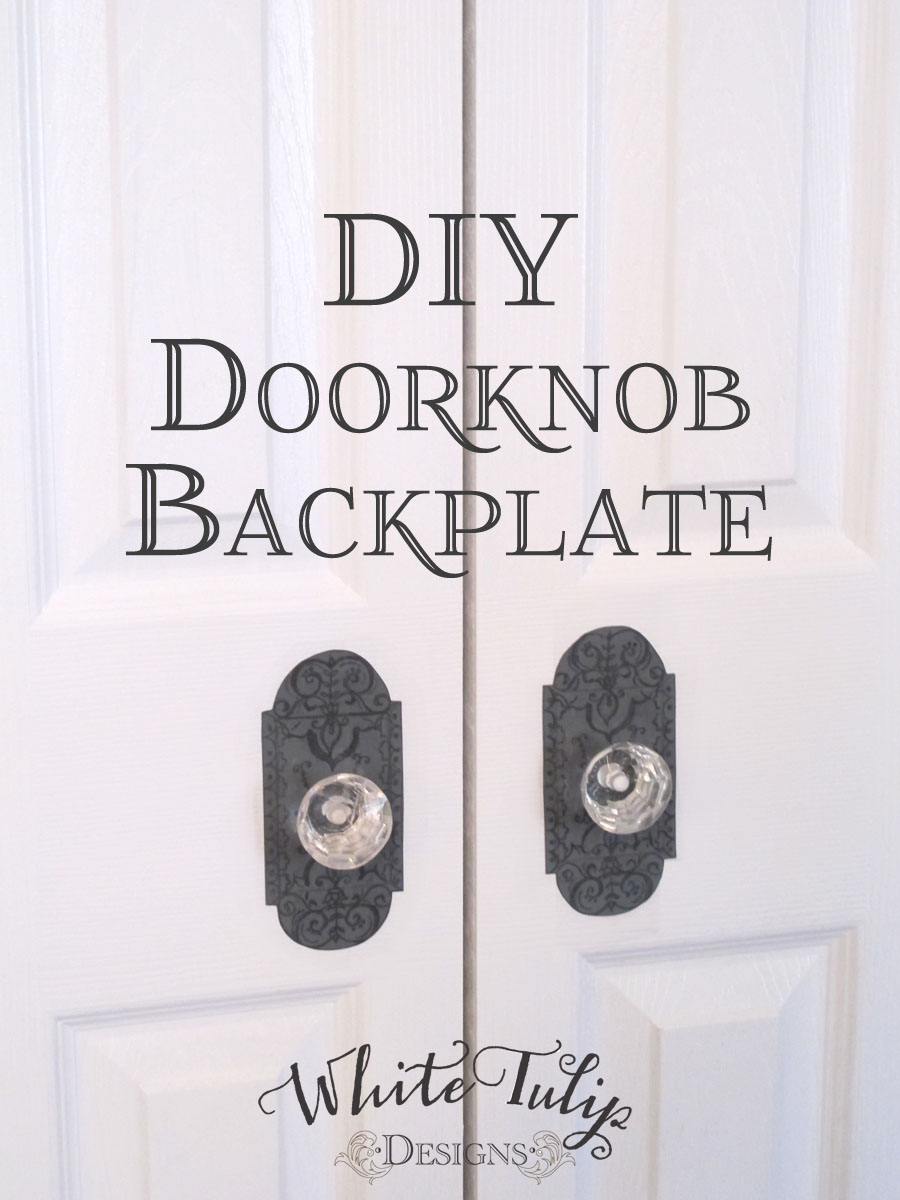
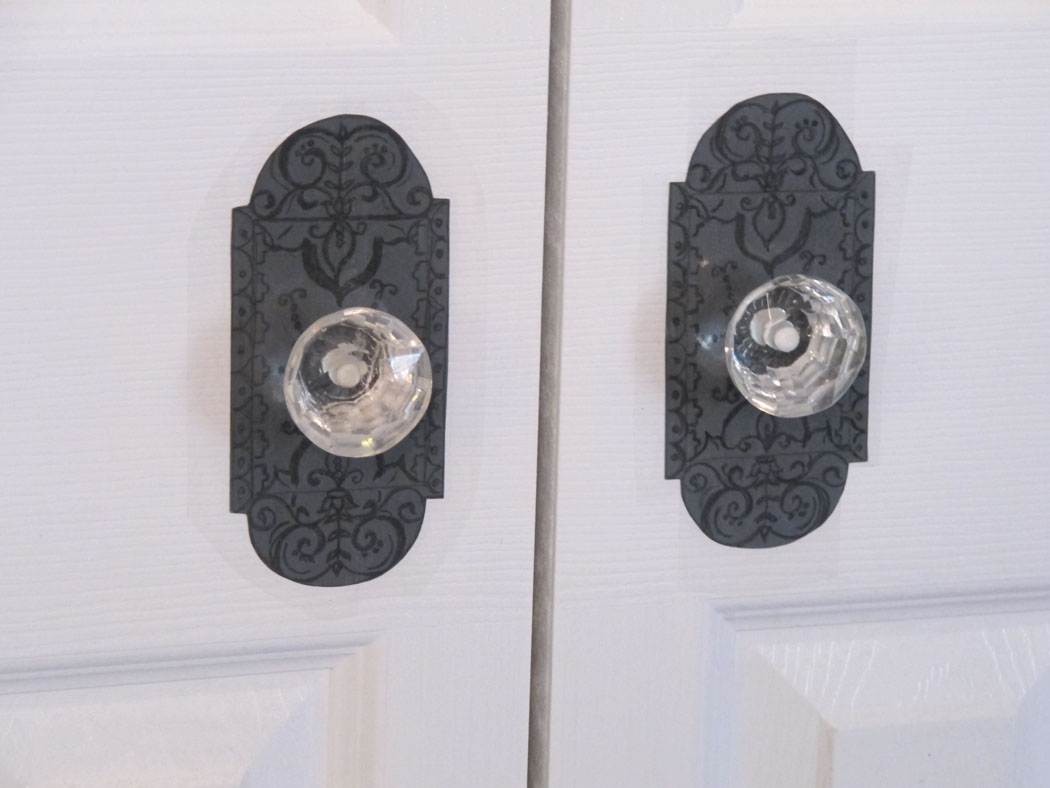
Finally, cute little door detail and something to help keep from smudging the white doors. Yeah!

Doorknob Backplate - White Tulip Designs

Linking up over at Metamorphosis Monday, Remodelaholics

Featured on Savvy Southern Style!


Best of 2015 » White Tulip Designs - 01/01/2022 - 10:25 am

[…] 5. DIY Door Back-plate […]

Chelsea @ The Johnsons Plus Dog - 11/04/2021 - 12:02 am

What a fun idea. Great transformation. Thanks for sharing at the #HomeMattersParty - hope to see you again this weekend!

[…] […]

Jennifer (White Tulip Designs) - 10/13/2015 - 10:49 pm

Thank you Emily! I’ll be there for sure!

Emily @ Two Purple Couches - 10/13/2015 - 10:35 pm

This is so beautiful! They look perfect on your doors! Thanks for linking up with Creative Spark. I’m featuring your project at this week’s party. I hope you’ll stop by to grab a “Featured” button and link up again! The party starts at 6am EST 🙂

[…] Click HERE for the instructions […]

[…] See it HERE! […]

Jennifer (White Tulip Studio) - 03/10/2021 - 8:17 am

Thank you! I’ll definitely be there!

Lou Lou Girls - 03/09/2021 - 6:30 pm

I’m loving this! Pinned and tweeted. I hope to see you tonight at 7 at our party. I can’t wait! Lou Lou Girls

Jennifer (White Tulip Studio) - 02/17/2015 - 9:03 pm

Thank you!

Joy @ Yesterfood - 02/17/2015 - 6:38 pm

Jennifer, I love this So. Much. I want them everywhere! 🙂 Thank you for sharing this idea with us at Treasure Box Tuesday- pinned and scheduled to tweet! 🙂

Jennifer (White Tulip Studio) - 02/10/2021 - 8:51 pm

Thank you Suzan!

Suzan - 02/10/2021 - 7:08 pm

You’re a genius - these are just gorgeous !
xox

Valentine’s Day wreath

Doesn’t it seem like we just finished Christmas? And we’re already looking at February, Yikes!

I’ve created a quick Valentine’s wreath project here.

Start with a plain wire hanger. Using regular pliers, straighten it out completely. (Straighten the spiral at the neck of the hanger as much as you possibly can. Then find the middle and bend the hanger “stick” in half. I put a bit of a twist in it to help with the rounded sides of the heart. Bring the two sides around, using your pliers to mold the shape as you go. Now, hook bend the two top ends to hook together and finish by bending them into the center of your heart.

Start Here - Heart wreath - White Tulip Designs                                     Finish Here - Heart wreath - White Tulip Designs

Cut a pile of ribbon and fabric scraps in different widths, textures, colors and patterns. All of them are roughly 7 inches long. Some of the ends are cut at an angle and some are straight across. Starting at the bottom of the heart “V” I tied each strip onto the form randomly choosing from the pile. As you go along twist the knots back and forth to fill out the heart.

Detail- Heart wreath - White Tulip Designs

And, how cute is this? All total, it took about 2-3 hours to put together. Also, it’s hanging using 2 magnetic hooks at the top of the heart. You could also make a much larger heart by putting together 2 straightened hangers and twisting them together at the bottom.

Valentine

button_cut

Jennifer (White Tulip Studio) - 02/15/2015 - 9:14 pm

Thank you so much! I will definitely be linking up again!

Lisa at Concord Cottage - 02/15/2015 - 8:23 pm

Hi Jennifer, this heart wreath turned out so stinkin cute such a great idea to use a wire hanger and scraps you have…LOVE it. Coming over from the Something To Talk About Link Party and of course you’re invited to link up again tomorrow 6 am est early morning again. Happy Sunday, Lisa at Concord Cottage

Jennifer (White Tulip Studio) - 02/15/2015 - 9:51 am

Thanks Amy!

Amy | Canary Street Crafts - 02/14/2015 - 9:42 pm

Love your Valentine wreath! So cute!!

DIY Valentine Wreath Inspiration - 02/13/2015 - 9:43 am

[…] Valentine’s Day Wreath // White Tulip Designs […]

Jennifer (White Tulip Studio) - 02/13/2015 - 9:17 am

Thank you so much!

Ashley ~ 3 Little Greenwoods - 02/12/2021 - 3:56 pm

Collecting ribbon is one of my favorite things! I can so see me making a wreath like this from all those scraps I have.

Thank you so much for sharing your post on Show Me Saturday! I am featuring your fabulous wreath in a roundup tomorrow.

Happy Valentine’s Day!
~ Ashley

Jennifer (White Tulip Studio) - 02/10/2021 - 8:52 pm

Thank you Renee!

Renee Fuller - 02/10/2021 - 7:19 pm

This is a cute wreath and so simple to make!

[…] See it HERE! […]

Jennifer (White Tulip Studio) - 02/02/2022 - 9:42 am

Thanks! Send a pic I’d love to see!

Paige McCord - 02/02/2022 - 9:07 am

That’s adorable. I think I will make one in grays and purple to match my front door.

Cookie Love

Growing up I always dreamed that I would be a Mom like June Cleaver, Marion Cunningham, or Carol Brady (well, Alice at least). Fast forward 30+ years and I find myself hoping that I can make it through the week without giving up and ordering pizza for dinner. I know having 1 doesn’t hold a candle to the juggling act of having 3 or 4 but there are still weeks that seem to slide through my fingers.

So, thanks to modern innovation, we can cheat when I comes to fresh after school cookies. And I don’t feel, One. Bit. Guilty. When I whip up these babies G thinks I’m a genius and he even know where they come from. (Bless him!)

So here we go . . .      A little after-school, easy-peasy, cookie love.

cookie love

Ingredients and supplies-

  •   Pre-made cookie dough tube

For chocolate ganache

  • 1/2 cup semi-sweet chocolate morsels
  • 2 tbsp. strong coffee (brewed)
  • 6 tbsp. milk (heavy cream is best but whatever you have on hand will work)
  • sprinkles, dots, etc. -whatever’s easiest

Double boiler (I prefer the low-end version using a metal or glass bowl propped on a saucepan -see pic, don’t judge me)

1. Begin by boiling a small to medium pan of water.

2. Cut 1 inch slices of pre-made sugar cookies dough (I’ve done this with peanut butter and it’s wonderful but G likes it simple.)

3. Space them evenly on a baking sheet, lined with parchment paper, 6 to a regular sized sheet works great. (The paper makes things lots easier later on. I use the grocery store version, not the more high-end but either is fine.)

4. First, “pinch” the bottoms of your little hearts to form a bit of a point.

5. Now, take a butter knife and notch the top of your heart. Take your fingers and gently soften the edges to smooth out your “heart”

Cookie Love_ frame 1

6. Bake cookies per directions (generally 11-12 minutes). I like to make these in small batches.

7. While baking, place a metal or glass bowl over your bowling water and add chocolate chips, coffee, and milk. Stir constantly until chocolate is smooth and melted. Remove from heat and place bowl on your work surface. (Bowl will be very hot)

Cookie Love_ frame 3

8. Here’s the fun part! The chocolate will stay thick and sticky while you work so there’s no need to rush. Drip a large spoonful of the chocolate ganache down one side of your heart while holding it over the bowl. Transfer over and spoon your sprinkles over another dish.  The ganache will remain sticky and not get hard so be sure to have your plate ready to lay these out on.

Since G is a little older I like to finish the cookies and chocolate and leave them until I pick him up from school. He still gets a kick out of watching the chocolate sprinkle process. (you’d think there was fire involved.)

cookie love

Thank you for joining in. If you have a quick and easy treat you like to whip up for your kids I’d love to hear about it!

Until next time . . .


Goin’ Shopping

Every time I go to the grocery store and come out with a heap of plastic bags I grumble all the way home about it. We re-use them as small can trash bags etc. but we are still over-run with bags! So. I’ve finally taken the plunge and started working on my own. I’ve completed 2 bags so far and will be finishing 2 more bags this week (1 - for produce and a special bag for meats that) Stay tuned for those tutorials as well.


Goin

I used a sturdy material that I got from Ikea along with a solid green to line the inside (and the straps) along with a black stripe fabric from my remnants drawer. Mine are pretty long to be sure nothing comes rolling out on the ride home. Don’t-cha hate that?!? But I’m so excited to whip these babies out in the checkout line! I’m actually looking forward to the grocery store this week. I’m sure we’ll still be bringing home the plastic now and then but we won’t be over-loaded with them.

I started working on a tutorial for these and realize it was becoming more confusing than helpful (remember, I do not claim a talent in the sewing arena) so I’ve attached a few great tutorials here that helped me put together my bags!

 Here’s my produce bag tutorial:

DIY market tote from White Tulip Designs

Check out these wonderful tutorials and projects:

Silly Pearl       Sawdust Girl       Maricucu


Linking up at: Wow Us Wednesday,

Produce bag » White Tulip Designs - 03/23/2015 - 10:53 am

[…] house. It was a bit of an adventure but they did turn out quite nicely, if I may say so myself. (see previous post here) However, I was afraid that including a tutorial might result in tears, mostly from […]

Craft Your Own Passion

If you follow me on social media you already know this but, in my it’s-time-to-upgrade-the-living-room frenzy, I made a kitty bed for Ashley. I’m planning on a more elaborate project to add it to a frame with cute legs, etc. But I wanted to start with a simple pillow. She loved it!

Cat bed

For about 20 minutes, then this . . . grrrrr.

Cat bed part 2

She hasn’t been near it since. As a crafter/DIY-er/maker do you ever feel like some people look at you like you’re from another planet? Since re-launching my blog as more of a companion to my creative side, that side of me has been in over-drive. I’m in heaven but the Hubbs and G go from thinking it’s funny to being a little nervous. (Let’s face it, not all projects can be accomplished without a helping hand.) Neither of them gets very excited about working on my home projects but they are really supportive and fairly complementary of the finished projects. But sometimes, you run into that person that cannot see the value in a handmade project or gift.

Do you ever spend hours or days on a project only to have someone look at your masterpiece and say, “Why?” Baffling, right? Don’t let it stop you or slow you down. This is part of who you are and they don’t understand it. To be honest everyone has something that they are passionate about that totally baffles the rest of us.

I think crafting went through a bit of a rough phase in the 70’s and 80’s. Think -kitchy, blehck! But, with the advent of Etsy, Pinterest, and an amazing array of DIY blogs this is our time folks!

Don’t be offended if someone doesn’t get your passion, they don’t don’t have too. Keep on craftin’, keep learning new techniques, keep collecting your tools and supplies, keep scouring Pinterest for new projects. And call your BCF (best crafting friend) to get your DIY on!

Me, I’m off to have a talk with Ashley about her new bed and I may or may not take a roll of duct tape with me.

Coming next week: I’ll be adding to the gallery wall and working on more upgrade-the-living room projects!


D I Y   S h o p