White Tulip Designs » Inspiration, Design, and DIY for all of life's events.

Masthead header

Pillow Rosettes

I love, love, love the shades of white, cottage chic, clean and simple trend.  (Think Joanna Gaines or Sarah Richardson.) However, here in my world that clean look would last about an hour and never be that white again. Seriously, who really does that. I’m fighting the good fight though. Currently we have brown sofas and I’m tired of how dark it all looks so I’m working on a little project to lighten things up a bit.

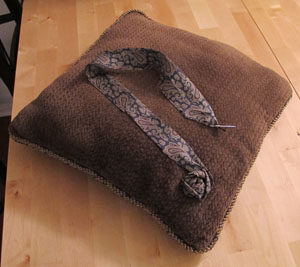
I’m adding some new, brighter, pillows but I’m also working on updating the factory ones that came with it. This first one isn’t too difficult but the pillow was beyond sad when I started but I’m quite pleased with how well it turned out.

Rosette Pillow individual

  1. Start with a length of thin fabric folded and ironed to be roughly inch wide and 3 feet long. *see below
  2. Using an embroidery or other large needle thread through the end of your fabric to use as a guide.
  3. To create your rosette, start by sewing a 5-pointed “star” using strong, color-coordinating, thread. (See map)            Rosette Map

  4. Start by tacking the loose end down to the center area then, begin to weave the end with the needle over and under the 5 legs of your start.
  5. Continue, over and under, round and round, until you reach the outside of the rosette.
  6. Tuck the end of the fabric back into your rosette and sculpt it a bit, if necessary. Easy peasy!!

Rosette Pillow 1                              Rosette Pillow 2

No more boring factory-pillow. Yipee!

Rosette Pillow cover

*I found some beautiful, barely worn, silk ties at my local thrift store for $1 each! So I rescued them, cleaned them a bit, pulled them apart and used the length of fabric here! Bonus!




Gallery Wall

So, this is where I started last year . . .

Office start

I know, not horrible, but not so exciting either.  It took lots of paint samples to make the final color decision but I finally settled on Valspar Deep Sea Dive (eggshell) . I’m in love! When I finished painting I was a bit panicky that I had gone a tad over-board but the gallery really brightens things up, don’t you think?

Gallery Wall -main - White Tulip DesignsI started by measuring the wall and cutting out a large piece of paper to match the measurements. (I used an old roll of wrapping paper.) Then I placed the different things I wanted to include in different places until everything came together the way I wanted.

Gallery Wall 1After that, I traced each piece and marked for the hanger/s on the back.  Then I taped my giant guide to the wall and either nailed through the paper or marked where the nail/anchor would go (depending on the size of the frame.) Except a little blank spot where I have a project that will be featured later. (shhhhh)

Gallery Wall 2


Here are some detail pics . . .

Gallery Wall Detail 1 -White Tulip Designs                                    Gallery Wall Detail 2 -White Tulip Designs

And finally!

Gallery Wall - White Tulip Designs

Remember the mess it was 2 weeks ago when I started the Funky Junk -Heap of Change challenge!

Linking up over at The Scoop and Metamorphosis Mondays!


[…] Gallery Wall post was also quite popular but I was never really happy with the pics. I think the dark color of […]

DIY Wall Decor Ideas & Do Tell Tuesday #62! - Vintage Zest - 05/05/2021 - 3:52 pm

[…] Gallery Wall from White Tulip Designs […]

[…] Sneak a little extra depth to a gallery with some taxidermy (faux or otherwise), 3D letters, or an ornate, chunky, frame! (See the original Gallery Wall Post here!) […]

Best of 2015 » White Tulip Designs - 01/01/2022 - 10:25 am

[…] 3. Gallery Wall […]

Jennifer (White Tulip Designs) - 10/29/2015 - 9:36 am

Thank you Keri!

Keri - 10/28/2015 - 8:44 am

Jennifer, this is awesome!! Love the gallery wall; it looks so beautiful!!

Jennifer (White Tulip Designs) - 08/04/2021 - 9:35 am

Thank you Abby!

Abby - 08/03/2021 - 11:11 pm

It’s beautiful! I love when gallery walls are a good mix of photos and other fun art.

Jennifer (White Tulip Designs) - 07/20/2015 - 7:56 pm

Thanks Lorelai!

Lorelai @ Life With Lorelai - 07/20/2015 - 7:41 pm

I love helpful tips that make perfection easier! Your gallery wall looks wonderful. Can’t wait to see what the secret project is… Thanks for sharing at the #HomeMattersParty - we hope to see you again next week. 🙂

~Lorelai
Life With Lorelai

[…] for the wall. Keep in mind, I’m starting with a bold, Peacock blue, blank slate . . . (see my Gallery Wall to get an […]

Jennifer (White Tulip Studio) - 03/15/2015 - 9:41 am

Thank you!

Reelika @Financially Wise On Heels - 03/15/2015 - 6:48 am

It really does look great! I know it takes some time to figure out how to make it perfect, but you did it 🙂

Wall Inspiration + Do Tell Tuesday - 02/24/2015 - 4:29 pm

[…] Gallery Wall from White Tulip Designs […]

Decorating Walls and Ceilings + Do Tell Tuesday - Mabey She Made It - 02/23/2015 - 11:58 pm

[…] Gallery Wall from White Tulip Designs […]

[…] Gallery Wall from White Tulip Designs […]

Jennifer (White Tulip Studio) - 02/16/2015 - 7:49 pm

Thank you! You too!

Creatively Homespun - 02/16/2015 - 2:07 pm

I always get SOOO nervous hanging stuff on walls. Great look, and great layout! Thanks for sharing at the Show me Sat link party! Enjoy your week.

Jennifer (White Tulip Studio) - 01/28/2015 - 7:35 pm

Thank you so much Coco!

Jennifer (White Tulip Studio) - 01/28/2015 - 7:33 pm

Thank you Angie!!

CoCo - 01/27/2015 - 9:59 pm

This gallery wall is amazing! Thanks so much for sharing the time saver not to mention a nail saver by marking the layout on paper. Totally genius. We appreciate you linking up to the Something to Talk About Link Party and we can’t wait to see what you have in store for us next week! All the best, CoCo

Angie - 01/27/2015 - 7:24 pm

Great transformation! Hard to get a gallery wall balanced sometimes but you nailed it! Thanks for linking up at Something To Talk About!

Jennifer (White Tulip Studio) - 01/27/2015 - 11:35 am

Thank you so much! I’m excited to be participating in your first link party!

Jenn & Vicki @ 2 Bees in a Pod - 01/27/2015 - 9:47 am

Your gallery wall turned out great! Love the idea of laying everything out and tracing it before committing to hammering in a nail 🙂 Thanks for linking up and sharing!

Jennifer (White Tulip Studio) - 01/22/2015 - 5:43 pm

Thank you so much! (And thanks for the link note! She’s back to work now.) I have really enjoyed watching all of your progress.

Funky Junk Interiors - 01/22/2015 - 1:55 pm

Ohhh my goodness… what a remarkable change! This is gorgeous!

FYI the link leading to the before doesn’t work… or didn’t for me… so I dug. Sorry I missed that post! 🙂

Ahh! You must be so pleased with this!

Jennifer (White Tulip Studio) - 01/22/2015 - 10:42 am

Thank you Fonda!

Fonda Rush - 01/22/2015 - 9:56 am

Lookin’ good! I’m glad you have the momentum continue! Nice wall arrangement! Keep up the good work!

Jennifer (White Tulip Studio) - 01/21/2015 - 8:38 pm

Thanks!

Paige - 01/21/2015 - 4:50 pm

Wow. It looks great. You have been busy. I love the idea of marking the layout on a piece of paper. Much better than having the hubby and kids stand there holding everything up!

Winter Warm-Up

Being completely honest, I really don’t mind being 43. And I really don’t think my friends who are my age and older don’t mind much either. The one thing that really bugs me is feeling like all of a sudden my choices for clothes, make-up, shoes, hair-length, etc. are mare scrutinized than ever. It’s probably my imagination but it does seem like clothing choices are slim for the 35-50 year old set.

It seems like, everything is either far too revealing (even if you have the body for it) or looks like something my grandmother would wear. UGH! What most people consider “professional” outfits do offer much better choices but when you work from home suits are not high on my priority list. I’ve recently lost a just enough weight to feel like rewarding myself with a new outfit and I’ve been hunting online for some hot new choices. This is what I’ve found so far. I think these will be great for winter work at home, running errands, or generally out and about. What do you think? Would you choose any of these?

Winter Warm up

1. Brown Boots  2. Jeans  3. Zip Sweater

4. Open Cardigan  5. Floral Tunic  6. Arrow Earrings

7. Brown Corduroy Pants   8. Winter Outfit  9. Black Booties

For even more inspiration, come visit my Pinterest “Outfit Ideas” page . . .

Follow Jennifer with WhiteTulipDesigns’s board Outfit Ideas on Pinterest.

Shadowbox

So now for the shadowbox from Tuesday’s butterfly project. I’m planning to add more butterflies to my little collection so I looked around for a simple, inexpensive, shadowbox and apparently they don’t exist, sort of.  I had already purchase some of the Ikea Ribba frames with nothing specific in mind. Mainly because they’re cute, well put together and super cheap! Like, $1.99 for a 5×7 frame (without the included mat). So, I decided if I ruined the frame I’m only out $1.99, right?

Supplies:

Shadowbox Supplies

Steps:

  1. Open your frame and remove backing easel and set aside.  Secure your glass inside with the attached metal tabs.
  2. Measure from the back of the glass to the top of the back trim.This will be the width of your foam strips, minus 1/4 inch to attach back.
  3. Cut strips of foam to fit along the inside sides. Be sure not to leave any openings between the pieces.
  4. Remove adhesive backing and attach, without any overlapping, around the inside of your frame.
  5. Place your feature piece inside of the frame (make sure your glass is clean first).
  6. Place the easel back on top of the inside foam. It should sit perfectly on top with a little ridge of frame still showing on all sides.
  7. I used more foam strips to seal all of the sides but if you’d like a more permanent eseal you can use masking or packaging tape to seal the back.

Butterfly frame

Butterfly frame finish


Shadowbox -FB image

*this post contains affiliate links

Linking up on Savvy Southern Style - Wow us Wednesday!

[…] shadowbox tutorial see HERE. Shares Posted in […]

Mounted Butterfly

Butterfly - repic

This may seem like an odd project but I really love the feel of nature inside the house. I’ve been seeing a lot of the mounted butterflies, dragonflies, and other colorful beauties and, aside from the creepy factor, I really like them! I started really looking into them and found that the nicer ones can also be a bit pricey too. So, I started tinkering with creating a little watercolor butterfly magic of my own.

Butterfly 6

No butterflies were  injured in the making of this project! She’s made from a watercolor painting and given a little nudge to be a bit more fun!

Butterfly 10


I used the Ikea Ribba frame as a shadow box to put this together. I’ll post about that process a little later. (Here’s a ready made shadow box frame, if you prefer.) But to “mount” the butterfly start by printing and cutting out the file below. There are guidelines around the edges of the butterfly and a “mat” with the scientific name to attach it to. Mine is printed on bright white copy paper.

Cut a piece of heavy black thread (I used quilting thread) about 4-5 inches long. Put a know in either end and trim the excess. Using wax paper and a pencil to add dimension I Mod-podged the antennae to stiffen them. You can see here that I used a pin to hold the antennae down to foam board while it dries.

Butterfly Antennae

Let the antennae dry completely overnight. Pull them off of the wax paper very carefully, keeping the “V” shape intact. There will be some dried Mod-podge flakes still on the thread but you can use your fingers to smooth them down. Don’t pick it off as it will ruin the shape. Give a gentle fold, without creasing too much, to the butterfly. Then you’ll want to attach the base of the antennae “V” to the top of your butterfly using glue.

Butterfly Attached


Using Pop-dots, I attached the butterfly to the mat page. Now he’s ready to frame! Come see him featured on my new gallery wall here:

Butterfly in Gallery


Download the printable file here: Butterfly Mount

For shadowbox tutorial see HERE.

Linking up at Met Monday,

Save

Jennifer (White Tulip Studio) - 03/03/2021 - 10:34 am

Thanks Christie! I’ll be there!

Christie - 03/02/2021 - 3:48 pm

This is beautiful! Thanks so much for sharing at Totally Terrific Tuesday! I hope you stop by to link up with us again this week. Remember the party starts tonight at 10pm!
Christie ~ Sparkles of Sunshine

Jennifer (White Tulip Studio) - 02/18/2015 - 9:14 pm

Thanks!

Jesica - 02/18/2015 - 7:34 pm

I love how you added the antennae, it gives it such a whimsical liveliness! Those ribba frames are so versatile, I have a few sitting around here waiting for fun projects too 🙂

Jennifer (White Tulip Studio) - 02/17/2015 - 2:23 pm

Thank you! I hope she enjoys it!

Debra (Eve Isle Studios) - 02/17/2015 - 2:10 pm

This is super cute! My daughter loves mounted butterflies. This would be a great project for her. Thanks for sharing!

Jennifer (White Tulip Studio) - 01/30/2015 - 9:29 am

Thank you!!

Ginger - 01/29/2015 - 7:43 pm

It’s so pretty! And way cheaper than getting real butterfly specimen art. Love it! Thanks for linking up to Show Me Saturday.

Shadowbox » White Tulip Designs - 01/16/2015 - 12:37 pm

[…] now for the shadowbox from Tuesday’s butterfly project. I’m planning to add more butterflies to my little collection so I looked around for a […]

D I Y   S h o p