White Tulip Designs » Inspiration, Design, and DIY for all of life's events.

Masthead header

Calendar Print

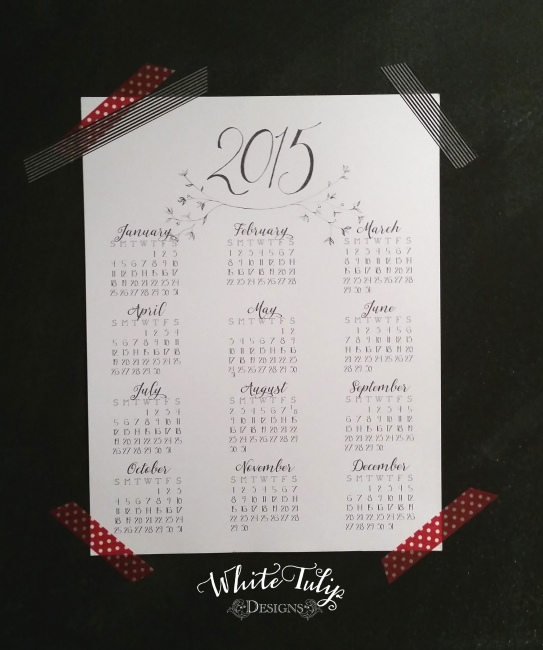
Can you believe there are roughly 3 weeks left until 2015?  When the 3 week kitchen reno was starting its 5th week I was getting a little antsy. When we emptied the kitchen everything went into the dining room which is where I usually do my painting. I was going through some withdrawals and pulled out my pens. Confession, I much prefer to paint because it comes easier for me. Pen and ink is NOT my strong suit but I figured any doodling was better than blank paper. Anyway, after loads of leaves and trees and other random things I decide to do something a little more useful and create a calendar.

Pic 2


It’s been so long since I’ve done something like this that I forgot how delicate drawing in just one color can look. I love the gradients from gray to black!

If you’d like your own copy of my happy little calendar you can purchase it in my shop.


Pic 1


If you’d like a print-it-yourself option visit my Etsy shop here.

Thank you by stopping by today! I look forward to our next visit.


Kitchen containers with Christmas cheer

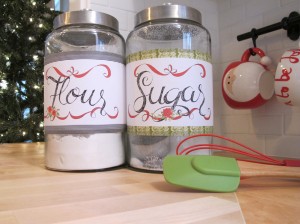
We have more family coming for holiday visits this year than usual and I feel a bit more pressure to spread a little more “cheer” into the kitchen. I recently replaced our ho-hum canister set with large glass ones that have a clean and simple look leaving the contents to be the star.

Canisters Tutorial

Aren’t they cute!  I sketched out a quick dress-up that can easily be thrown away at the end of the holidays. (And, you can re-print for next year!) I used washi-tape that I had on hand to attach the labels but you can use a clear tape or 2-sided tape.

Canisters Tutorial -Canisters Tutorial 2


The printable PDF file includes blanks with the holiday frames and flowers to fill in your own (cookies, coffee, tea, etc.)  Download and print your labels here!


Linking up at Met Monday, Remodelaholic,

Jennifer (White Tulip Designs) - 12/02/2015 - 11:38 am

Thank you Debbie!

Debbie - 12/01/2015 - 11:27 am

These canister labels are so cut. Thanks for sharing. Merry Christmas!

Christmas Cards 2014

Ok, so in all fairness I’ve spent the last several years doing cards and labels for clients all over the country but somehow I never seem to manage to get my own out.  For that matter, it’s been forever since we’ve gotten family pictures made. Shameful, I know.  Any-whoo, this year I finally managed to get a bit more organized. I even designed a new template! And, I’m sharing it here . . .

These are done using watercolor artwork I knocked out the other weekend. (Hence the motivation for the cards!)

If you like these, you can download you own template files and your own pictures and text!  Be sure to save the templates as a PNG file to keep the areas open for your pictures.  If you don’t have access to Photoshop or similar photo program, I’ve also included directions for using these templates on Picmonkey to create your own Christmas cards.

Here are the template pages to download: Card front , Card back, & a Card back without text.

I hope you enjoy these.  FYI - I used Tansy and Ayers for my fonts.  If  you want to share you finished cards, I’d love to see them!

Pictures by Val Wead Photography

Poppies


Check out matching postage here on Zazzle!  And address labels here!


Using Picmonkey

1. Open Picmonkey, select “Design”, then the 5×7 size.

2. Select the butterfly icon to add in the design overlay. Select the “Your Own” button.

3. From there find the PNG file you downloaded from here. Enlarge the picture to fit.

4. Repeat the overlay steps and add in your picture. Right click over the picture and select “sent to back” from the drop down menu.

5. Now you can add text by selecting the “Tt” from the lefthand side. (You can use the fonts on your computer too!) From here you can adjust the size color and center your text in the window that will appear on the right side of your screen.

6. All Done!! Now click “Save” above your work and this will allow you to save the page to your computer. I suggest saving as a Jpeg in the “Pierce” size.

You can do this for both sides and send the files to your local printer or print on your own computer!


Join the Link Party to get more DIY projects and ideas!


button_cut


Linking up at Met Monday!

[…] If you are creating a photo or artwork based layout, I suggest you use PicMonkey. (Here’s a PicMonkey tutorial from last […]

Lovely Soap Dispenser

I’ve been so excited about this project but  waited until the kitchen was finished to put it together. I spent a while looking for the perfect bottle shape and fell in love with the vintage-y look of this tequila bottle.

Pretty Kitchen Soap Dispenser

I used the pump from an empty soap bottle (but you can purchase new ones online) and converted it to use in my bottle using a length of tubing from the plumbing department at Home Depot. I brought the tube from the old pump with me to find the correct size. The new tube is flexible and I cut it long so the it lays on the bottom of the bottle really well.

SuppliesTubing


The cork was a larger size that I purchased from a craft store. I soaked mine in water for about an hour before I started to make working with the cork a little easier. It was a tight squeeze even after it soaking so I trimmed it to fit using an exacto blade. For the hole in the center, I used a drill with a bit just larger than the tubing size. Then, I used a slightly larger bit to make the top part of the hole fit the pump itself.

Funnel


Since everything fits snugly I didn’t use any glue so that it would make it easier to fill and re-fill. (Luckily I had a small funnel on hand to fill the bottle.) The bottle is nice and heavy so it makes it good and sturdy for the back of the sink. It’s also super practical, as it holds a large bottle of soap without needing a re-fill for quite a while.


 Thanks for stopping by!


I’m linking up over at Wow Us Wednesday!

[…] I wanted to share a project that was one of my very first. And, I still use it every day. I love my fancy dish soap pump! I remember coming up with the idea and making the plan which, of course, didn’t work out […]

Jennifer (White Tulip Studio) - 03/12/2015 - 9:21 pm

Thanks!

Amy | Canary Street Crafts - 03/12/2015 - 8:55 pm

So pretty! That’s a great idea to use a cork too!

Yummy cold weather cookies

(This is a re-post from last year.)

Known by many different names, Russian Tea Cakes, Mexican Wedding Cookies, Snowballs, etc, these are super-easy to make and delicious every time. When I was a little girl, I always thought these cookies were super fancy and had to be so hard to make because they were a staple at a ’70’s wedding reception. When I discovered how easy they are to make I couldn’t figure out why we didn’t have these every-day!  So, without further discussion, let’s get cooking . . .

(Don’t forget to print your recipe card, below, before you get started!)

Title

Makes: 3-4 dozen (depending on size of cookies)
Takes:  15 minutes prep time
25-30 minutes cook time
15-20 minutes finish time

Ingredients

1 cup (16 tbsp) unsalted butter, softened
1/3 cup powdered sugar
1 tsp. vanilla
1 1/2 cups flour
1 cup chopped nuts (pecans, almonds or walnuts)
*also,  ½ cup powdered sugar for dusting

Instructions
-Preheat oven to 275°
-Cream butter, sugar, and vanilla until smooth.

pic 1  -Slowly add flour (as you mix) and beat until well combined.
-Stir in nuts and mix to incorporate.
-Form dough into 1-inch balls and place onto parchment lined baking sheet.

pic 2Place cookies about 2 inches apart.
Bake at 275F for 25-27 minutes.  ~You can bake multiple pans on different levels if you rotate pans halfway through baking time.
-As you remove warm cookies from the pans, roll them one at a time in a
shallow dish of remaining powdered sugar. Once you’ve completed a tray of rolled cookies, sift/sprinkle an additional layer of sugar over them. I prefer to wait until they are on they serving tray for this step to hide any dings and
dents from moving them into place.

These can be kept up to about a week in an air-tight container.

IMG_4174

Here’s a printable recipe card with cut lines:   Printable Recipe Card

D I Y   S h o p