White Tulip Designs » Inspiration, Design, and DIY for all of life's events.

Masthead header

Sweater Re-mix

I do not profess to be much of a seamstress but I sure do fake it ok.  And, as luck would have it, Hubbs got me a new machine this year. Which also means I’ve temporarily converted our dining room into a sewing room. (Shhh, don’t tell.) I’ve been scouring my how-to books, Pinterest, and the rest of the internet for projects so I can play with my new toy.

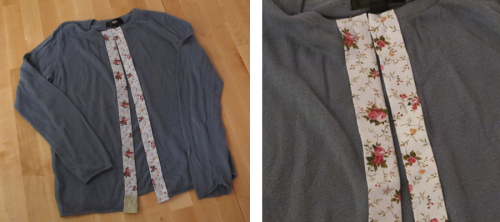
A while back I pinned an adorable project from Sew Caroline that I’ve really wanted to try. I’ve needed a little update to a sweater that was starting to look a bit sad and was headed to the donation bin. I’m thinking this will come in handy through the spring! I made a few changes to her tutorial and my flowers are different. You can see I decided to forgo the loop and button to leave it open.


Sweater Remix - main image


The edging fabric makes it a bit more feminine than it originally did. I tried my hand at the rosettes she used in her tutorial but mine were not nearly as pretty and looked bit too heavy. I also used a felt backing to sew the rosettes directly to the sweater rather than pin them on. It should still be fairly easy to hand-wash and spot clean.

After smoothing out the sweater and cutting a straight line down the middle of the front, I started by ironing strips of 4 inch wide fabric folded in on both sides (in a “V” shape) with the raw edges on the inside. Then I pinned the strips onto either side of the opening and tucked in the raw edges at the top and bottom. I also added a plain, detail piece at the bottom on the left. I just felt like it needed it.


Sweater Remix - pinned

The rosettes I made were 2 circles in varying sizes (one was 4 and the other 6 inches). Then I sewed a running stitch about 1/4 inch from the edge all around the outside. Then pull it tight, making sort of a balloon shape and secure it there. Then, I mashed it down into a circle.


Sweater Remix - flowers

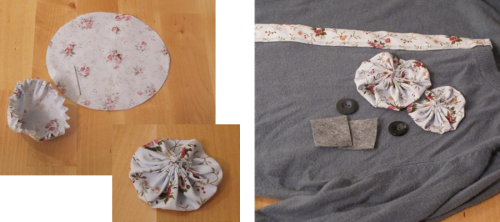
Using felt pieces to stabilize I secured the flowers in place them finished the centers with a button.

It really dresses up a t-shirt right? I love it!!

Sweater Remix


Come see the original tutorial over at Sew Caroline!


Egg-cellent Breakfast!

Here’s an idea for a quick Saturday morning breakfast. This is inspired by a Rachel Khoo recipe from “The Little French Kitchen”. This is a fairly American-ized version of her Croque Madame Muffins.

Egg-cellent Breakfast cover

Made from items you most likely have on hand. I used a variety of grated cheeses (cheddar, smoked gouda, & colby jack) left over from some other recipes.

Basic Ingredients:

  • eggs (1 for every 2 muffin cups)
  • sliced bread
  • cheese (your choice; grated works best)
  • milk
  • meat (I used leftover baked ham but sausage or bacon would work great)
  • butter (melted)
  • salt & pepper to taste
  • Possible add-ins: onions, peppers, mushrooms

Start by cuttingand chopping your cheese, meat and other add-ins. Then, using a pastry brush, lightly butter your muffin tin and pre-heat your over to 325˚.

Trim the crusts off of your bread slices (set these aside) squaring the sides. Using a rolling pin (or heavy glass) to roll out the slices.

Egg-cellent Breakfast bread

Butter the slices and smoosh (totally a technical term) them down into the muffin pan making little bread cups. Beat your eggs with milk (approximately ¼cup milk for every 4 eggs) and add salt and pepper to taste. Lay your meat slices/chunks in the bottom of your bread cups. Add about ½-¾ cup of your eggs mixture. You’ll want to add in any other mix-ins at this point. You can add in small pieces of the cut bread ends if you think it looks too soupy.

Egg-cellent Breakfast filling

Sprinkle cheese (about 1 tablespoon per cup) over the top. Put into your over on the center rack and cook at 325˚ for 16-20 minutes.  FYI- These can also be made ahead and refrigerated overnight! Great for Saturday morning games.

Egg-cellent Breakfast -yummy

Enjoy! See you next week!

I’m linking up at  “The Scoop” & Metamorphosis Monday!

Jennifer (White Tulip Designs) - 10/10/2021 - 10:30 am

Thank you Denise!

Denise - 10/10/2021 - 10:07 am

I’m so hungry right now, this looks delicious! Thanks for linking up to Home Matters Party. #HomeMattersParty http://cu-rio.net/home-matters-linky-party-58/

Jennifer (White Tulip Studio) - 02/10/2021 - 10:07 am

Thank you! I’m so happy to be a part of the party!

Jennifer (White Tulip Studio) - 02/10/2021 - 10:06 am

Thank you! Love being a part of the party! (Great to hear from another Carolina Girl!)

Angie - 02/09/2021 - 8:46 pm

Love easy breakfast recipes! Thanks for sharing at Something To Talk About Link Party!

Bluwatergal - 02/09/2021 - 8:39 pm

Breakfast is my favorite meal ~ well except maybe brunch could be my favorite meal ~ but this works for both! My family is from Greenville SC so I’ve spent a fair amount of time in your part of the state 🙂 Thanks for sharing today at our Something To Talk About link party and hope to see you next week too! Bwg ~~~

Heap of Change - with Funky Junk Interiors

One of my favorite bloggers, Donna with Funky Junk Interiors,  has issued a New Year’s challenge and I’m taking it on. Funky Junk Interiors has issued a challenge to pick a space in your house to purge, organize, and otherwise clean it up. So, here’s my space.

Clutter Challenge

I started working on this home office spot a year ago (see the original post) and things quickly came to a stand still. I put together the inspiration pics and  even finished a few projects but, as you know, life happens and it looks worse now than when I started.  I’m hoping that by joining the challenge I will have no choice but to stick to it. Who’s with me? For more info, take a look at her post. Whether you’re a blogger or not, you can join the challenge too!

Heap-of-Change-Challenge-on-FunkyJunkInteriors.net_.38-PM

I’ll be checking in throughout January and I’ll let you know how it goes. Wish me luck!

It’s finally done!!! Come see . . .           Gallery Wall - White Tulip Designs

[…] Remember the mess it was 2 weeks ago when I started the Funky Junk -Heap of Change challenge! […]

Colors!

Well, I’m making the leap and going gray and you might too!

NW022

Don’t panic, it’s not that! (Well, that too but that’s not what I mean here.) I’m slowly painting over my warmer, cream and tan walls with grays and other cooler colors.  Years ago, when I went back to school for Graphic Design I learned about the Pantone color report and Pantone goodies. If you’re at all interested in design (fashion, interior, or any other kind of design) you’re going to want to know about Pantone. They are the global authority on color and provides the tools for which designers everywhere stay current with all upcoming color trends. (FYI - my favorites are the new grays, Glacier Gray and Titanium . . . love, love, love!)

When I was looking at updating our paint colors I looked to the Spring 2015 color report. Now, in all honesty, I’m not a fan of the color of the year, Marsala


But here are some of my favorites:

Colors

Before you start shopping for your next date-night outfit or living room wall paint keep these colors in mind. These will be the colors available in next seasons fabrics, fixtures, accessories, and all other design details. Moreover, if you’re interested to see what colors will be everywhere next year you have to visit the Pantone website.


Kitchen Cabinet - Rast Hack

Welcome to my foray into the world of Ikea hacking.  This is probably the most hacked Ikea item so it seemed like the best to try first. My little Rast cabinet is used as one giant junk drawer!

Like most people, I was somewhat underwhelmed when I put it together. It was fairly simple to put together but really small. Trust me, I looked at it in the store but it still seemed so much smaller in my house.

So, I headed out to my local Home Depot to find some legs. I really wanted some cute little bun feet to dress thing up but I was really trying to keep the project as inexpensive as possible. Instead of using regular bun feet I happened by the decking aisle and spotted these beauties! Decking finials! Who knew? (See here: Treated Gothic Finials.) They are also taller than most of the bun feet available which is a big help. I also purchased to pieces of furniture grade hobby board to attach the “feet” to the bottom of my little chest.

It doesn’t look too bad all out together but for my purposed I really needed to beef it up a bit. Like my snazzy little teal/turquoise knobs? I actually purchased these before I chose the color. AND, I purchased them when they were 50% off, BONUS!


Rast Hack - plain


My next step was choosing the color. I wanted something to give a punch of color to my black, white, and gray kitchen.  I used a bright blue and purchased a paint sample rather than a larger can that would never get used.  (Sorry, but I’ve miss placed the can and I don’t remember the color.) I also purchase decorative knobs from Hobby Lobby to add to help upgrade the look. It has a weird open area across the front along the bottom so I ended up adding a piece of common board to cover it.

Rast Hack

The chest is perfect to help keep my counters clean. I use it as the “mail dump”! We divided the drawers and each of us gets our own junk drawer! I would highly recommend it. If you’ve lost something in my house, this is where you look!


This post contains product links.

Linking up at Wow Us WednesdayThe Scoop & Metamorphosis Monday

button_cut

[…] Blue Kitchen Cabinet […]

Lou Lou Girls - 04/11/2021 - 2:35 pm

Love it. Pinned and tweeted. We appreciate you being a part of our party. Please stop by on Monday at 7 pm. Happy Saturday! Lou Lou Girls

Jennifer (White Tulip Studio) - 02/19/2015 - 10:10 pm

Thank you!!

Vicki and Jennifer 2 Bees in a Pod - 02/19/2015 - 9:57 pm

Jennifer - we love your hack and it is such a great success! You did a fabulous job of totally transforming your cabinet from blah to wow! Thank you so very much for linking up to Something To Talk About!

Jennifer (White Tulip Studio) - 02/08/2021 - 11:13 am

Thank you!

Laurie - 02/07/2021 - 9:54 pm

Wow! Love what you did with this piece!

D I Y   S h o p