White Tulip Designs » Inspiration, Design, and DIY for all of life's events.

Masthead header

Jewelry Storage

Do you ever find yourself cruising through Pinterest projects thinking “hmmm, something like this would work great in my house”?  Then, later, you find the perfect detail to kick off your own project. In this case it was a set of discarded shutters at my local ReStore.
 

Jewelry Holder


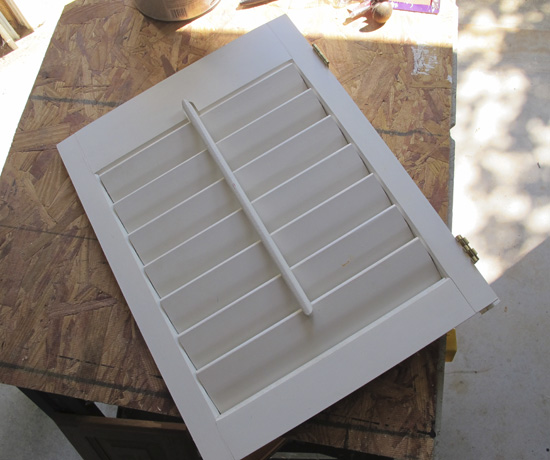
Most of the jewelry holders I’ve seen around the web have a super-feminine look with ribbon and lace to hang earrings and other jewelry on. However, as much as I love that look it wouldn’t really fit in with our master bathroom.  So, using a shutter door as a base, I started putting it together with scrap wood that I had on hand. Incidentally, I have a collection of knobs that I rescued from the bargain bin at Pier One Imports for around .90 each (major score!!) I picked through my knobs and found 2 that worked well to add both a decorative and functional element.
 

Jewelry Holder - 2


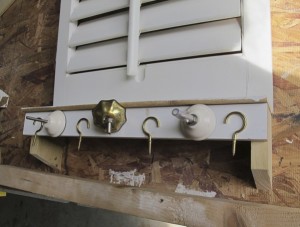
After removing the shutter tilt rod and the staple connectors I cut the scrap wood pieces to size and attached them in place using wood screws. I mounted everything on what would be the back of the shutter so everything would have a cleaner look. The shutter tilt rod would have kept it from lying flat against the wall. 

Hint: You may want to give the pieces a coat of paint before putting them together than you can touch up after. I wish I had.
 

Jewelry Holder - 3  Jewelry Holder - 4


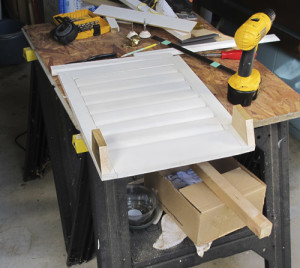
Once all the pieces were attached I drilled holes to attach the knobs and the cup hooks. You’ll notice I attached a flat piece at the front, but a bit below the shelf to attach the decorative knobs. The space behind it allows for the post to stick out from the back. This will give me another spot to hang necklaces, or other items if I want. Then I drilled holes on either side to insert wires (this comes next) to hang earrings. Most all of my earrings are fish-hook style so this worked pretty well.


Jewelry Holder - 6    Jewelry Holder - 5


The holes on either side of the frame shutter (see above) were drilled about 2.5 inches apart. The “wire” is from 2 white metal hangers. To get the right size, I measured from left to right, in the center of the holes and added a little over an inch on either side. Using wire cutters, I cut down the hanger and then bent the ends at right angles using a pair of pliers. The wires didn’t need to be glued in or anything as the tension held them tightly in place.


DIY Jewelry Holder with inexpensive and reclaimed materials - White Tulip Designs


The entire piece is actually fairly lightweight so I used 2 nails to hang it level on the wall and 2 small wood screws to stretch picture wire along the back of the shutter.  Everything hangs really well, without tangling or falling off. I did’t intend to use the shelf really but I think it might hold a small tray nicely.


DIY Jewelry Holder with inexpensive and reclaimed materials - White Tulip Designs


Supplies:

Tools:

  • Saw: I use a Craftsman Miter Saw (similar) but any saw could work
  • Drill: Basic rechargeable Dewalt drill
  • Power driver (if you do a lot of DIY around the house I highly recommend investing in one of these)


This project was inspired by these amazing posts:

Infarrantly Creative  -  Everything Fab  -  Songbird - Facilisimo


*This post contains affiliate links but all views regarding product recommendations are my own! For more info refer to my policies page, thank you for stopping by!


Linking up at Met Monday, the Scoop, Wow us Wednesday, Remodelaholic


Jennifer (White Tulip Designs) - 10/21/2015 - 9:09 am

Thank you Emily! I’ll be heading over!

[…] […]

Emily @ Two Purple Couches - 10/20/2015 - 9:06 pm

This is so neat! I love how it turned out. What a great way to re-use a shutter! I’m featuring your jewelry storage at this week’s Creative Spark party. The party begins at 6am EST tomorrow - hope you’ll stop by to grab a “featured” button and link up again 😀

Jennifer (White Tulip Designs) - 09/10/2015 - 7:06 pm

Thank you!

Shann Eva - 09/09/2015 - 3:49 pm

Such an awesome idea! I love it. Thank you for linking up at #HomeMattersParty and hope to see you again soon.

Jennifer (White Tulip Designs) - 08/20/2015 - 3:08 pm

Thanks for stopping by!

Judith - 08/19/2015 - 10:20 pm

I have a jewelry designer friend who would absolutely love this as a display!

[…] love this creative use for a small shutter by White Tulip Designs. I would never thought to use one for jewelry storage but the way Jennifer rescued this one with […]

Jennifer (White Tulip Designs) - 08/08/2015 - 3:03 pm

Thanks Alayna!

Jennifer (White Tulip Designs) - 08/07/2015 - 8:02 pm

Thank you!

Alayna @AlaynasCreations - 08/07/2015 - 3:18 pm

What a great way to re-use a shutter. The finished project looks great - and I love the knobs!

I am co-hosting the #HomeMattersParty link party this month and would love to have you stop by for a visit. The current party is open through Monday. http://alaynascreations.co/2015/08/07/home-matters-linky-party-49/

the cape on the corner - 08/07/2015 - 1:27 pm

love this!
b

Jennifer (White Tulip Designs) - 08/06/2015 - 12:27 pm

Thanks Jess!

Jess - 08/06/2015 - 10:48 am

I totally love this! So cute!

Thanks for joining Cooking and Crafting with J & J!

Julie - 08/05/2015 - 11:33 am

Hi Jennifer,
I love this pretty jewelry holder. Thanks so much for sharing this and joining our Cooking and Crafting with J & J link up. We hope to see you again.
Julie

Back to School - Lunchbox Notes

Saturday Style will be back next week. With the new school season just around the corner, I want to share a collection of DIY Lunchbox Notes that I created when I first started toying with having a blog. Incidentally, it was also G’s first day of middle school.

Back2School
Believe it or not, he still loves getting little notes in his lunchbox. Don’t get me wrong, as his age, I would never be allowed to add a “cute” note.  It’s mote like “Good luck on your test . . . love Mom!”  Last year he mentioned that his friends had seen the note that I had tucked in with his ham sandwich. With a little gasp, I asked if he would prefer that I not put them in anymore. He said, quite clearly, “No! My friends were all jealous. Why would you stop?”

I was surprised. But maybe I underestimated how sweet middle school boys can actually be. They may not want to claim you in public but that doesn’t mean they don’t need to know you’re there, just out of site.

Back2School 8
It never hurts to send them out into the world with a smile in their pocket. Come to think of it, I think I could use a little note in my lunch some days. How about you?

 Have a lovely weekend!! See you next week!

   *Don’t forget to check out the original post to get your free printable!

Linking up at The Scoop,


Smart Power Tool

Did anybody else go a little nuts on Prime day?  I normally don’t go in for all that crazy-ness but I decided to take a peak that Wednesday morning and an hour later my whole perspective had changed. And now, (drumroll please!) I have a new jigsaw among other random item. The most important is the jigsaw, of course. It’s a Black & Decker JS660 Jig Saw with Smart Select Dial and, it’s available from Amazon for $38.99 (with Prime.) Try Amazon Prime 30-Day Free Trial


Jigsaw - Smart Power tool - White Tulip Designs

If you’re starting a collection of power tools, the jigsaw should be toward the top of your list. My list is a bit backwards since Hubbs had a few larger tools before we met.  I’ve been wanting to get a jigsaw for certain projects for a while now. My plan was to get a cheap-y one to start with but when Prime day came along, I found this little beauty.

 Jigsaw - Smart Power tool - White Tulip Designs

It’s so easy to use, G is even comfortable handling it. I’ve been trying to get him excited about working on wood projects but he gets a little nervous about the miter saw and my hand sander. And I get a little nervous about him using the drill for anything.


Jigsaw  -Smart Power Tool - White Tulip Designs


This model is, by far, a step up from the ones I had been looking at. So far I’ve used it on different wood projects, a vinyl piece, and a small metal piece. I haven’t used the Accu-Bevel lever for a miter cut yet but I have a project coming up that it should work nicely for!


*This post is not a product endorsement but it does contain affiliate links. All views regarding product recommendations are my own! For more info refer to my policies page, thank you for stopping by!


Craft Room - Saturday Style

This summer has been wonderful for spending time outside and working on wood projects there have been some other things that have fallen behind. So, as a result, I’ve been way behind in my drawing and painting but I promise I’m working on some new free printables over the next few weeks. I’ll be finishing up projects this weekend and getting back into the craft room any day now! What kind of space do you have carved out for your crafts? Do you dream of having a huge, organized space for your crafting, like I do? Hopefully this will inspire us to get to work on that . . .

 Craft Room Inspiration - Saturday Style


Oh, a girl can dream, right? Are you looking for more craft room ideas for storage and organization?
 

Follow White Tulip Designs’s board Craft Room on Pinterest.

 
Linking up at Met Monday, The Scoop,
Jennifer (White Tulip Designs) - 08/05/2015 - 9:49 pm

Thanks for stopping by, Dorene! I’m so glad you like it. The best thing about putting together inspiration boards is daydreaming about perfect spaces!

Dorene @ Seasonal Chapters - 08/05/2015 - 9:04 pm

Jennifer, I just found your blog at Between Naps On The Porch, and have enjoyed browsing around. I loved the inspiration you have here for craft rooms. I don’t have a designated room to work in, or store my supplies in, but a girl can dream right? Thanks for sharing the great ideas.
Dorene

Boy’s Teen Room Inspiration

Officially, I’ve been the Mom of a teenager for a year now. But, now that we’re almost at the end of summer it’s really starting to sink in. In a matter of weeks, he’ll be in High School. Yikes!

Since June I’ve watched him grow and mature in amazing ways. I’ve been wanting to give his room an overhaul for a while now but he has been really wanting to keep it as is. Which is not much to get excited about now. He still has the bright blue paint color that he’s had since he was in elementary school that I am dying to change. We did a small update in 5th grade where I added a real desk, a bean bag chair, new shelving, and changed his dinosaur bedding for a simple Ikea design in shades of gray and blue.

I think he’s been worried I would over so it in the “cute” department. To get him on board, I’ve been putting together some inspiration from around the web. Wanna see?

Gage loves things with both American and British flag details. I love this chest from Miss Mustard Seed, don’t you?


Boy

Oooh! What about this Union Jack pegboard? I think this would be fabulous for as a full wall of storage, maybe? (Check out this room from Our Fifth House, it’s so cute for a boy of almost any age.)


 To be honest, G hasn’t quite bought into the whole wood paneling detail wall idea, but here’s hoping. I really love the idea of the mix of wood and paint! Either way, the wood adds so much warmth and texture.


Boy                             Boy

Can you tell, I love that preppy, navy, rustic look? He loves navy blue but he’s a little wishy-washy about the preppy thing so I pulled together a few other ideas.

If G were more of a surfer boy, I would be pushing this like crazy! How cool are these ideas?


Boy              


I have a feeling we”’ end up doing something a bit more industrial looking.  We’ve been on the lookout for more permanent pieces that can be carried into his college days and a bit beyond. 


Boy’s Teen Room Inspiration – from White Tulip Designs

 Aren’t these school lockers fantastic? I’ve been on the hunt for some like this forever!

      Boy’s Teen Room Inspiration – from White Tulip Designs

 Now matter how it ends up, I really want it to be all about him so that his personality shows through.  Wish us luck? Have you been working on new room ideas for your kids? Where do you find your inspiration?

Have a great weekend! See you soon! - XOX

D I Y   S h o p