
Do you ever find yourself cruising through Pinterest projects thinking “hmmm, something like this would work great in my house”? Then, later, you find the perfect detail to kick off your own project. In this case it was a set of discarded shutters at my local ReStore.
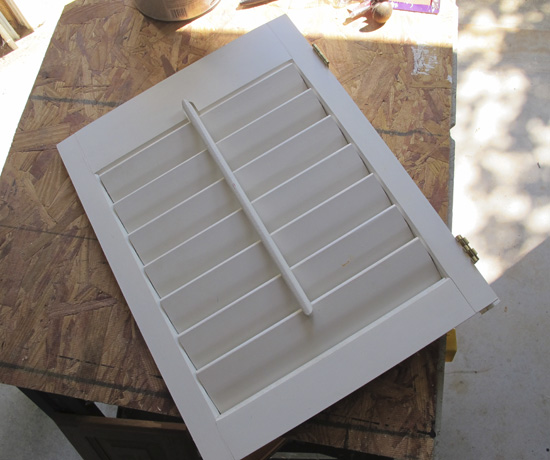
Most of the jewelry holders I’ve seen around the web have a super-feminine look with ribbon and lace to hang earrings and other jewelry on. However, as much as I love that look it wouldn’t really fit in with our master bathroom. So, using a shutter door as a base, I started putting it together with scrap wood that I had on hand. Incidentally, I have a collection of knobs that I rescued from the bargain bin at Pier One Imports for around .90 each (major score!!) I picked through my knobs and found 2 that worked well to add both a decorative and functional element.

After removing the shutter tilt rod and the staple connectors I cut the scrap wood pieces to size and attached them in place using wood screws. I mounted everything on what would be the back of the shutter so everything would have a cleaner look. The shutter tilt rod would have kept it from lying flat against the wall.
Hint: You may want to give the pieces a coat of paint before putting them together than you can touch up after. I wish I had.
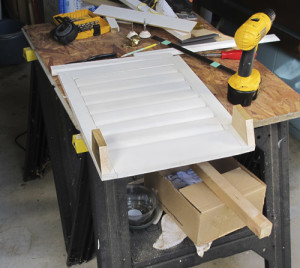

Once all the pieces were attached I drilled holes to attach the knobs and the cup hooks. You’ll notice I attached a flat piece at the front, but a bit below the shelf to attach the decorative knobs. The space behind it allows for the post to stick out from the back. This will give me another spot to hang necklaces, or other items if I want. Then I drilled holes on either side to insert wires (this comes next) to hang earrings. Most all of my earrings are fish-hook style so this worked pretty well.
The holes on either side of the frame shutter (see above) were drilled about 2.5 inches apart. The “wire” is from 2 white metal hangers. To get the right size, I measured from left to right, in the center of the holes and added a little over an inch on either side. Using wire cutters, I cut down the hanger and then bent the ends at right angles using a pair of pliers. The wires didn’t need to be glued in or anything as the tension held them tightly in place.
The entire piece is actually fairly lightweight so I used 2 nails to hang it level on the wall and 2 small wood screws to stretch picture wire along the back of the shutter. Everything hangs really well, without tangling or falling off. I did’t intend to use the shelf really but I think it might hold a small tray nicely.
Supplies:
- Re-claimed shutter: mine was $5
- Wire Hangers: free
- Various Scrap Wood: free
- Decorative Knobs: $3
- Large Cup Hooks: $1 - $5
- White Paint
Tools:
- Saw: I use a Craftsman Miter Saw (similar) but any saw could work
- Drill: Basic rechargeable Dewalt drill
- Power driver (if you do a lot of DIY around the house I highly recommend investing in one of these)
This project was inspired by these amazing posts:
Infarrantly Creative - Everything Fab - Songbird - Facilisimo
*This post contains affiliate links but all views regarding product recommendations are my own! For more info refer to my policies page, thank you for stopping by!
Linking up at Met Monday, the Scoop, Wow us Wednesday, Remodelaholic,


Jennifer (White Tulip Designs)
Thank you Emily! I’ll be heading over!
[…] […]
This is so neat! I love how it turned out. What a great way to re-use a shutter! I’m featuring your jewelry storage at this week’s Creative Spark party. The party begins at 6am EST tomorrow - hope you’ll stop by to grab a “featured” button and link up again 😀
Thank you!
Such an awesome idea! I love it. Thank you for linking up at #HomeMattersParty and hope to see you again soon.
Thanks for stopping by!
I have a jewelry designer friend who would absolutely love this as a display!
[…] love this creative use for a small shutter by White Tulip Designs. I would never thought to use one for jewelry storage but the way Jennifer rescued this one with […]
Thanks Alayna!
Thank you!
What a great way to re-use a shutter. The finished project looks great - and I love the knobs!
I am co-hosting the #HomeMattersParty link party this month and would love to have you stop by for a visit. The current party is open through Monday. http://alaynascreations.co/2015/08/07/home-matters-linky-party-49/
love this!
b
Thanks Jess!
I totally love this! So cute!
Thanks for joining Cooking and Crafting with J & J!
Hi Jennifer,
I love this pretty jewelry holder. Thanks so much for sharing this and joining our Cooking and Crafting with J & J link up. We hope to see you again.
Julie