White Tulip Designs » Inspiration, Design, and DIY for all of life's events.

Masthead header

Let’s Start Small

Hope you had a lovely Thanksgiving weekend!

Don’t you love to cover your home in Christmas cheer? Unfortunately, it can sometimes be a bit overwhelming. And, let’s face it, Pinterest doesn’t help. “Ohh, I can make that!” and, “Wow, that’s a great idea!” can quickly turn into “I just give up!” in no time flat. My suggestion, don’t over-do it. Each year I try to work on a major project or two and a small collection of small projects and let our schedule dictate everything else. For this year’s big project, I’m making us all stockings. (Fingers crossed!) But, I’m also trying to up my gifting game.


Mini-Wreath - 1


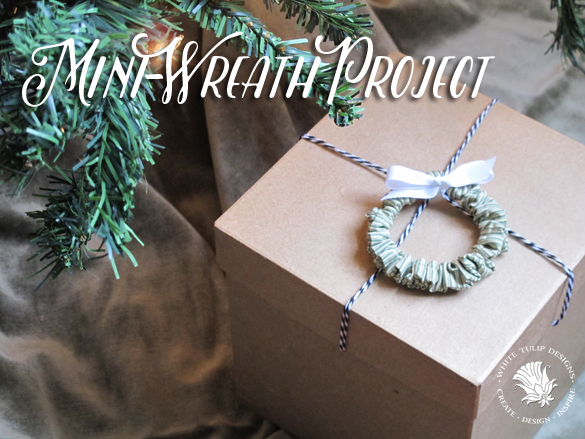
  Since I’ve had the sewing machine out anyway, I decided to put together a few small projects to share with y’all! Let’s start with this sweet little wreath. I used a scrap of green striped fabric, floral wire and a simple running stitch to put these together. These would be a great topper for a teacher or neighbor gift.


Mini-Wreath - 2


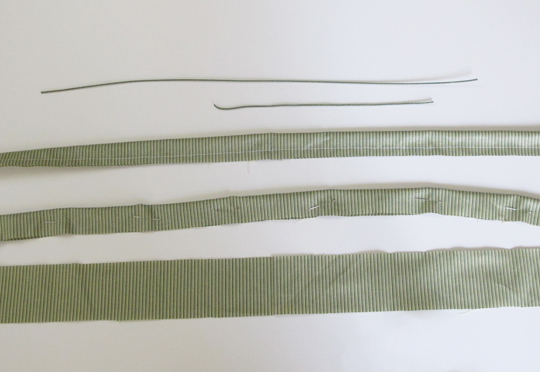
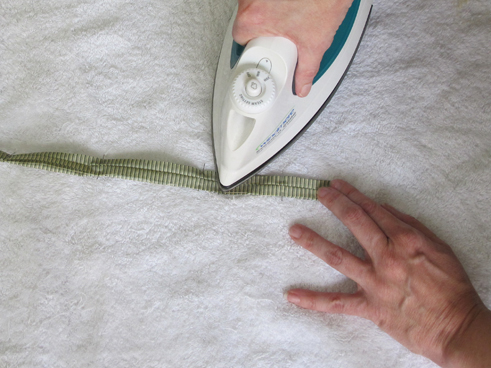
Start with a length of floral wire and green fabric “sleeves” sewn about 1 inch wide. My wires are cut to 9 inches. Iron the sleeves with the seam open to add a bit of stiffness.


Mini-Wreath - 3


Turn your sleeves right side out and thread the floral wire through. Now twist each end of the wire together and pull the sleeve ends over to cover. There’s no need to finish the ends but I folded each end in a bit to keep them from unraveling.


Mini-Wreath - 4


I used a basic grosgrain ribbon to tie my little wreath onto the package. How easy is that? This would be a great project to get your child started with some basic sewing skills. And a great way to use those small scraps of fabric you can’t bear to part with!


Mini-Wreath - 5


Want more wreath inspiration? See these posts!

Linking up at Met Monday,

Jennifer (White Tulip Designs) - 12/06/2021 - 9:51 pm

Hi Meredith, I’m so glad you stopped by!

Meredith @ The Palette Muse - 12/05/2021 - 8:00 pm

This little wreath is so stinkin’ adorable, and I love your philosophy of starting small. I decided to not be overwhelmed this year, and so far am sticking to it. I love the idea of just doing a few small, meaningful things.

Handmade Gifts - Quilt

Generally speaking, we all love the idea of handmade things. However, folks tend to turn up their noses at handmade Christmas gifts, no matter how well they turn out. This year, I’m attempting to make gifts as many gifts as possible. I’m aiming for around 8-10. (Cross your fingers for me!) As I share these little projects, I hope to inspire you to do the same! No matter what your chosen medium, I’d love for you to share your handmade gifts as well! 

For this week’s gift, I’m sharing a quilted blanket I made for G. This is my first quilt, so be kind! It’s mainly made from a collection of dress shirts and t-shirts that he’s grown out of over the last few years. And, there’s no batting since he runs fairly hot and as it’s really meant to lay across the foot of his bed.


Holiday Handmade - lap quilt cover


The front is a collection of squares cut from his dress shirts but I ran short and ended adding in two from Hubb’s closet that I was planning to donate anyway. Once I had all of the squares cut out (6.5 x 6.5 - to allow a .25 inch all the way around) I lay the out on the dining room table to be sure that the arrangement was fairly balanced and random.


Holiday Handmade - lap quilt 1


Considering, I basically had no idea what I was doing, it was no surprise that they ended up a tad unbalanced. Nothing a ruler and a pair of scissors wouldn’t cure! Now, for the back! I used old t-shirts that I had been saving for a while with a project like this in mind.  These were cut larger to create 8 inch squares.


Holiday Handmade - lap quilt 2


Since I didn’t use batting, all had to do to finish it was sew the right sides together. Once I had turned it right side out and stitched up the opening from the outside, I ironed it to be sure all of the edges were straight, etc.  Next, I stitched the front to the back on the corners of the top side and alternately added shirt-buttons for a little bit of detail. The buttons mostly came from the dress shirts that I used but I added a few from my collection as well.


Holiday Handmade - lap quilt 3


You wouldn’t believe how soft it is! And, it has a nice weight to it. I can’t wait to give it to him. I feel quite sure it won’t be as popular as video games, or anything else on his wish list. However, I feel quite confident, it will last much longer.

When I was a little girl I remember my great grandmother making quilts by hand. I remember thinking how old-fashioned and dated they looked. There were lots of color palettes from the 60’s and 70’s which didn’t go over to well for a teen in the 80’s. These days, I really wish I had one of those quilts.


Have a lovely afternoon! Talk to you soon!

Linking up at Met Monday!

Guest Room - Inspiration Board

I hope you’ve had a lovely week! I’d like to thank everyone who’s completed the survey so far. If you’d still like to to fill it out I will leave it open through next week. Complete the survey here.  This is really helping me to plan projects and schedule posts.

With Thanksgiving and a Christmas right around the corner it seems like this is the perfect time of year to give our guest room a little upgrade. The last few years, ours has been in rough shape, to say the least. The guest room is always the one that ends up as a multi-functional dumping ground of leftover furniture and hand-me-down accessories from other rooms. Hopefully, I’ll be able to get it completed by the time our first guest arrives. In the meantime, I wanted to share my ideas for the new space! Please fell free to comment if you have any ideas!

Here is the basic layout of the room:

Guest Room layout


Keep in mind, the carpet is emerald green (I did not choose it) and I’m planning to pull it up and replace it with either hardwood floors or something similar. Unfortunately, that won’t happen until next Spring or Summer. So, we’re going to work around it for now.

Guest Room Inspiration


Cannonball Bed (similar)  -  Storage Bench  -  Window Project  -  Rug  -  Wall Sconces - Highboy Chest (similar)

I’m on the lookout for budget friendly wall-art ideas and shopping our house for other pieces to fill the space! I’ll be sharing all of the projects and ideas as I put it together! Feel free to share your advice for putting together a cozy guest room!

xo- See you soon!

Linking up at: Met Monday ,

Bat Craft Crazy!

Bat Crazy - White Tulip Designs


Have you had your fill of pumpkins yet? Maybe you’re looking for some new Halloween ideas. Well, around here we’re been Bat-Craft-Crazy! I know it’s kindof weird but the other night I was doing some Pinterest surfing through Halloween and Fall ideas and started noticing some adorable “Bat” ideas. Of course, they don’t exactly work as a carry over into Thanksgiving like fall leaves and pumpkins but they are so stinkin’ cute!


This toddler “bat” costume from Mer Mag is the perfect argument for batty cuteness!


These photo props, from One Creative Mommy, would be a great idea for a pre-teen Halloween party.


You know how I love a clean and simple wreath project! Love it!!!


The perfect way to be the hit at your pre-schoolers party! Almost too cute to eat! Almost.


Great idea from Dana Made It! I would love to figure out a waterproof way to do this outside, thoughts?

  • Flock of Bats / Dana Made It    


I love this idea from Chelsea’s Messy Apron, but who doesn’t love a Reeses cups project?


Funky and fun way to add a subtle dash of Halloween to your decor from Young House Love.


Our neighborhood kids would love these hanging bats from Layla Palmer!


This centerpiece from Katie Sears would a fabulous addition to an entryway table for your trick-or-treaters!


Awww, you had me at Garlands! Those google eyes are perfect!

  • Halloween Garland / Meine Svenja  


Adorable treat boxes from Practically Functional are a great way to kick that school party up a notch!


This mobile from Martha Stewart would make a perfect silhouette in your window!

  • Bat Mobile / Martha Stewart    bat-mobile


Great idea from a Beautiful Mess, to give cupcakes a simple touch of Halloween.


I can’t decide if these bats from Jonathan Fong are super creepy or really cute, they are so REAL, right?

  • Hanging Branch Centerpiece / Jonathan Fong for eHow    


These bat chips from Simply Designing would also be great for a Batman themed party!


Finishing up with this cute and easy idea for your candy swag from Just Another Day in Paradise!


I hope you enjoyed this little round up of Bat-ty Halloween Ideas. Believe it, or not I still have a few more Halloween ideas coming your way next week!

For now, I’m asking for your help. I’m working on a blog remodel and I would really love to get your ideas and input. If you have a few minutes and would like to participate, select the link below and take my survey. If you get your blog posts by email you will receive an invitation by mail, later this week. If you read the blog through Bloglovin’ or another feed-reader please take the survey here.


White Tulip Designs - Blog Survey


Thank you for your help! I look forward to hearing from you!


Halloween Tea-Towels

Pumpkin Towels - White Tulip Designs


At this point, if you enjoy decorating for Halloween, your home is completed covered in Spooky-goodness! Each year I try to create to new projects to add to my Halloween decor collection. Obviously, I went a little nuts in the the fabric pumpkin department. However, I really wanted to add a touch of something new to the kitchen. This is a project you can finish in no time.

I bought these tea-towels a few months ago and knew, as soon as I saw them, what I wanted to do with them.  They are perfect to add a subtle hint of Halloween with a clean and simple design.


Pumpkin Towels - 2

Supplies:

Before you start, you’ll want to be sure to wash and iron your tea towels, making sure they are pressed into the same dimensions.


Pumpkin Towels - White Tulip Designs


Start by mixing the white paint and textile medium together (read you products specific directions before mixing). Then, I suggest free-hand drawing the basic shape of the pumpkin you’d like on your first towel. Don’t worry about any stray lines, they will disappear soon anyway!


Pumpkin Towels - White Tulip Designs


Now, paint that cutie in exactly the way you want it and let it dry. After about an hour, use a clear ruler to mark the dimensions and where your new pumpkin should lay.  Now draw and paint in your new pumpkin. Since the towels have a slightly different pattern, I wanted my pumpkins to be similar, but not match. If you prefer to have your match exactly, you can create a stencil to use as a guide for both. 


Pumpkin Towels - White Tulip Designs


Pumpkin Towels - 1


I’ve created a printable stencil for you to use to create your own Halloween tea-towels here! These are for personal use only, thank you.  Enjoy!

 Tea-Towel stencils


Easy Halloween Project


See you soon!


*This post contains affiliate links but all views regarding product recommendations are my own! For more info refer to my policies page, thank you for stopping by!


D I Y   S h o p