White Tulip Designs » Inspiration, Design, and DIY for all of life's events.

Masthead header

Snow Day

Snow Day


I usually feel like snow/ice days like this come at the worst times. But when I have an unexpected opportunity to stop the world and spend the time with my child I can’t help but be thankful.

I’m sure, you’ve figured out by now that I’m based in the Southeast, specifically in upstate South Carolina. We do have very cold weather (32° and below) every year. Unfortunately, we quite often get a lot of ice, not snow, and this year was textbook. When it became really clear that G would be home for a day I started lining up projects that I might need a helping hand to get done. I even had him convinced to spend the day helping me out. I mean, we both knew he wasn’t going out to play in the ice, right? And, even though the roads were a solid sheet of ice there was much in the grassy (sled) areas.

Yesterday morning came around and we ended up just sitting around and talking. We never even started on my great list of projects. He did venture out for a bit to see what the other kids were up to but I took the time to catch up on some chores around the house. It’s wonderful to be able to take time and talk about whatever he’s interested in. And, I never regret the lost time later - it’s always totally worth it! I can’t believe he will be in high school next year. Where did all of the time go?

So goes the best laid plans good intentions. I promise to be back at it today!

If you’re still stuck, good luck, you’re in my thoughts. Do your best to take a breath and find a silver lining.

Making Lemonade

This is all about being stuck with a pair of ugly old lemons and making lemonade, Or something like that . . .

Do you ever feel like you have certain parts of your house are just working against you? I mean, I know that anything can be relocated or reworked but sometimes the cost or event the effort is so far down my wish list it’s just not worth it. But, for the past few days I’ve enjoying my beautiful peacock blue wall and the thermostat and the doorbell chime are just glaring down at me. It’s like the t-shirt tags in those commercials.

BLAH, BLAH, BLAH, BLAH, BLAH . . . I.   Can’t.   Stand.   It.

Bare thermostat (yuck!)

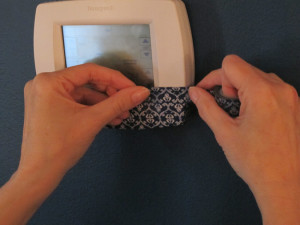
So, Hubbs came home from work the other day to find me wrapping the thermostat, mummy-style with washi tape. Genius! Right? Well, not quite. It was perfect to cover the box I had overdone it a bit covering the censors and the tape started pulling away from the plastic about the time I finished it. I mulled it over a bit and called my craftiest friend and came up with an alternate plan.


Round 1 - washi tape       Fabric Tape - love!


I couldn’t bear to remove all that work so G pulled it off for me. He may not be all that into crafting with me but he’s my go-to guy when I need something pulled apart.

Fabric tape! I haven’t had much of a chance to play around with it but I know that, since it’s fabric rather than paper you can get a bit more wiggle out of it and the tape I’ve worked with is much stickier than washi. SO, now that I’ve figured it out, here we go!

1. Clean the box with a little bit of alcohol being very careful not to get any part of the sensors wet.

2. I used tape in a small pattern so that I could use either long strips or a patchwork of pieces and you wouldn’t be able to distinguish from a short distance.

3. I barely put any on top or on bottom where the censors are and concentrated mainly on the face. You should have a button on the screen to “clean” that will keep you from changing your settings by mistake while working on your little masterpiece.


Covered Thermostat - be careful not to cover sensors

4. You’ll roughly follow the same steps and the chime box is much easier, but I definitely wanted to cover the bottom since it’s so high on the wall.

Covered door chime box

I don’t have the rest of the wall finished so I can only show the wall with the new covered fixtures. But, oh how much better it looks!! (I’m working on some DIY shelves and some other things.) Even with the cute patterns, it blends into the wall so much better!

Quick and easy way to make your built in fixtures blend in to your darker walls.

Linking up over at Fluster Buster , Savvy Southern Style , and How to Get Organized at Home!

Jennifer (White Tulip Studio) - 03/21/2015 - 9:34 am

Thank you Sharon!!

Sharon Rowe - 03/21/2015 - 6:46 am

This is beautiful! Thank you for sharing on Monday Madness Link Party 🙂

Jennifer (White Tulip Studio) - 03/16/2015 - 5:18 pm

Thank you! I’ll definitely be there!!

Lou Lou Girls - 03/16/2015 - 2:03 pm

Oh my…cute idea! I always get so excited to see what you have brought to the party! Pinned and tweeted. Thank you for being part of our party. I hope to see you on tonight at 7. Lou Lou Girls

Jennifer (White Tulip Studio) - 02/16/2015 - 8:54 pm

Thank you!

Jennifer (White Tulip Studio) - 02/16/2015 - 8:54 pm

Thanks!

Dinah - 02/16/2015 - 6:18 pm

What a great idea for covering such an unsightly necessity!!

Amanda - 02/16/2015 - 4:10 pm

Ha, I love it! Ingenious, I never thought to cover that very boring thermostat!

Dining Room Shelves

I’ve never been much of a “formal” dining room kind of girl. But I’m not quite sure how I want ours to look either.  We put up the wallpaper about a year ago and painted an old dresser to use as a sideboard. To add a little storage, Hubbs and I put together some shelves above the sideboard.


Dining Room Shelves 1 - White Tulip Designs

We made the top shelf using common board (11.5 inches wide), basic braces, and chair rail trim. We attached the trim to sit about 1/2 inch above the outer edge.  For the lower shelf I wanted something more like a plate rail.

Dining Room Shelves - 3


I used a picture ledge from Ikea and added more of the chair rails trim around the outside to give a bit more of a cottage look. Perfect! Stay tuned for more pics of the dining room all put together!


Dining Room Shelves

I’m linking up over at The Scoop!


[…] Dining Room Shelves […]

[…] has some pretty fantastic picture ledge that I’ve used in other spots and other projects (see dining room shelves) but they  wouldn’t quite work here. So, I made some that were very similar but fit my […]

Valentine’s Red For All Year

I’ve had more fun decorating for Valentine’s and reading about all of the adorable projects, ideas, and recipes. My favorite is how much people are integrating red (or pink) details into their existing design and decor. I’m so excited about all of the red especially! I’m ready to start decorating with red everyday! I’d love to paint a room red but I don’t think I could get away with that. Any-who . . . here are some amazing red decor ideas for all year round. These folks have done a beautiful job taming the spiciest color in the rainbow.

Valentine

(Links listed from top to bottom, and left to right)

        1. Stone Gable tablescape    2. Savvy Southern Style bedroom    3. French Country Cottage elegant bathroom             4. Camilla at Home shelves   5. The Lettered Cottage - kitchen     6. Katrin Cargill Interiors linen cabinet

No affiliate links were included in this post.

Conquer Your Cabinets

My relationship with my kitchen has been a bit of a love/hate situation since long before the reno. Keeping the cabinets was a huge money saver but they are smaller than normal (grrr) so organizing them for storage is a bit wonky to say the least. The worst ones are 11 in. wide and 11½ in. deep. My dinner plates won’t even fit inside! I finally got sick of fighting with them and came up with a plan that works for me and there’s no more wasted space!

I started by cutting small pieces of wood (approximately 1x2x2) to attach as braces and cutting thin slices of craft wood to use as shelves. I put down shelf paper throughout the kitchen to make all of the cabinets easier to wipe down and the bright white helps keep things from getting list.

First of all, I put together a cabinet to hold all of those random, odd-sized things that I use every time I cook.

This cabinet holds my cutting boards (the small blue ones are for cutting cheese, the green ones are for fruits and veggies, and the white ones are for meat) against one side with a small wood block screwed to the bottom of the cabinet. Then, I attached hooks around the top of the back and opposite side to hold measuring spoons and measuring cups. The back hooks hold my 4.5 in. cutter (see my lunchbox pizzas!), my small hand sifter, a mini grater and a lemon zester. I also have a small jar that holds extra measuring spoons and a stack of pinch bowls that I can grab quickly. In the shelf above, I have stacked glass measuring cups and my larger grater as well as a larger sifter.

Then, I took over the cabinets on either side of the oven to store my plastic storage containers.  The cabinet on the left holds my simple (and cheap!) Ikea containers and the right is for a set of Rubbermaid that fits together really well. When we finished the reno I threw all the other mismatched pieces out!


It’s been so nice not to have to wrestle with lids and containers every time I try to put away leftovers. And it makes it easier for the boys to help out!  I used my little wooden blocks to add a “loft” in the back/top of the cabinet to keep from having such large stacks to dig through. (See the cute little shelves I added in!) On the shelf above the Ikea containers I have cooking oils and vinegars and on the opposite top shelf I have an over-sized travel mug collection.

In my other cabinets I have risers to help with stacking glasses and plates, a nifty little carousel (that’s tough to photograph) to house my pots and pans, as well as a cabinet with dividers to hold sheet pans and muffin tins.

I kick myself for not taking ownership of this kitchen years ago. I’m sure a lot of it may not make sense to everyone but, in the end, I’ve made the kitchen work for me and they was I cook. Everything I’ve added can be easily removed or adjusted if we move, get new cabinets, etc.  I do still have one major cabinet to force into submission. A baking cabinet. I want to get used to using it for a while before I decide how to organize it best to work for me. I will happily share the final results when I have them!

*Note: I cleaned the wood blocks and screws before installing them in the cabinet since they weren’t originally made to be food safe.

This post includes affiliate links. All links are to exact products shown.

Linking up over at Pieced Pastimes, Wow us Wednesday, Met Monday, & The Scoop!

Wasted Spaces » White Tulip Designs - 10/04/2015 - 12:07 pm

[…] you’re here don’t forget to check out my built-in spice rack, cabinet organization or take a tour of the whole […]

Jennifer (White Tulip Studio) - 02/17/2015 - 9:04 pm

Thank you!

Mila - 02/17/2015 - 8:15 pm

I really like the simplicity of your organization. No need for expensive gadgets to make the kitchen functional. I too like to use a space for a bit before deciding if it is going to work for me long term.

D I Y   S h o p