White Tulip Designs » Inspiration, Design, and DIY for all of life's events.

Masthead header

Rustic Window Mirror

Last summer I was poking around my local Re-Store and found a fantastic pile of used windows for $5 each! (If you are looking for used building materials, etc. try your local Re-Store, they are a great resource.) I really didn’t know what I would do with them but I grabbed 3 since I knew I’d never find them like that when I did have a project in mind. When I started thinking about doing some rehab on our guest room I found just the perfect project for one of them. 

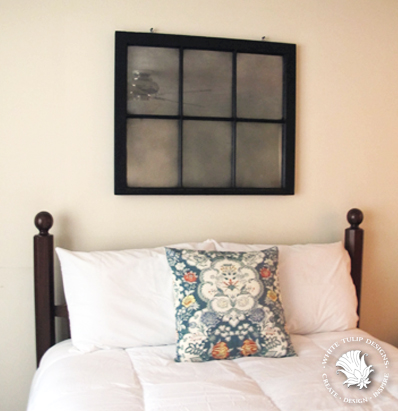
I wanted to have a large piece to center over the bed that I could add pictures and other items as I collected them. So I turned the window into a rustic-looking mirror. It’s not meant to be so clear that you can do your make-up just a reflective surface to add some character and a bit more light to the room.

Cover - Window Mirror


It was pretty rough  to start with so I used a wire brush and sand paper to clean the window as well as I could.


Window 1


After it was nice and clean I taped off the panes and sprayed the back of each pane with Rust-Oleum Specialty Mirror Spray.  Once it was dry, I painted over the “mirror effect” paint with a heavy gray (I used leftover paint from the kitchen cabinets!) to help seal it in. Then I painted the front of my window in a basic black. It required lots of drying overnight, etc. but all in all it was a fairly simple process.


Here’s a quick, step by step, slideshow . . . .


And here she is! I used heavy duty wall anchors in the wall and large lag eye-screws to attach it (links show similar items). The wall anchors I used are rated to hold 65 pounds each so she’s not coming down any time soon.


Cover - Window Mirror 2


See you soon!

*This post contains affiliate links but all views regarding product recommendations are my own! For more info refer to my policies page, thank you for stopping by!

Quick Garden Spruce Up

The last two weeks I’ve been spending a lot of time in the garden getting things spruced up, adding mulch and fertilizer, checking to see who made through the winter and adding in some “annual” color.

Tour - 7


Last year I ordered a peony through our landscaper and I’ve been watching him emerge from the ground with utter amazement. I didn’t realize he would die back so far and I really thought I’d lost him. The first pic is from a few weeks age and the second is from today!


Tour -Peony 1                                           Tour -Peony 2

Since I started the garden spruce-up I do a little tour to see how everyone’s doing and watching all of my perennials wake up. I think this may be the year that my hydrangeas really make show. (Fingers crossed!) And, we’ve decided to add some new azaleas to fill in different corners of the yard. I’ve always wanted to have giant ones like my Grandmother had in her yard when I was growing up. I swear they were as big as a Volkswagen. So today I thought I share some of my favorites and let you join me on my daily garden tour! 


Tour - 3                                                      Tour - 2


Tour - 5


Tour - 6                 Tour - 4


Here are some of my favorite perennials and annuals. If you are new to gardening and uncomfortable about getting started try container gardening. If your plants don’t fair well (or you change your mind about where you out them) you can’t rearrange your whole garden! I still like to use pots to give some height to lower growing flowers. Be sure to check the USDA plant hardiness zone map before you start purchasing any plants.

Perennials can be sort of pricey to fill your entire garden with so I like to add a few more each year. It also give me chance to get and idea which work better and where. To avoid losing any, be sure to check whether your plants are full sun, part sun, or shade lovers, what type of soil they prefer and how much water/fertilizer they require before you plant.


Collection of  Reliable Perennials:

Salvia               Liriope

Hydrangea               Astilbe

Salvia, Lantana, Liriope, Phlox, Hydrangea, Echinacea (Cone Flower), Peony, Astilbe & Lavender

Annuals provide a splash of color that will fade (and die) at the end of the season. Some will die in late summer and some will go in early fall. (Check your zone for the best idea of when you’ll start to lose them).  However, if you live in warmer climates you may be lucky enough to hang on to your annuals for more than one season. This can sometimes happen if the grower is located relatively close and in the same zone. Don’t count on it but keep that in mind when planning next years plantings. I tend to have great luck getting about 50% of snapdragons to come back for a year or two!


Favorite Annuals to add a Splash of Color!

Geranium                Pansy

Snapdragons                Zinnias

 Geraniums, Begonias, Pansy, Marigolds, Snapdragons, Morning Glory, Zinnias, &  Impatiens


I hope this gives you some great inspiration! Feel free to pop over and share some garden inspiration on my Facebook page!

See you soon!! Have a lovely day!


Market Time!

Cover

Our local farmer’s market opened this week! And around here that means that warm weather is officially here to stay for a while.  I never really shopped at farmer’s markets too much until I moved out this way and now I really don’t know how I survived without one. Ours is owned and run by the most wonderful family. They have seasonal plants, as well as a fantastic array of fruits and veggies. Not to mention a great range of dairy products from a local dairy. If you follow my Instagram, you know I can’t resist sharing pics of our visits!


Jams and Jellies


Farmer’s Markets are the best place to find “local honey”. And, if you’re traveling south, you’re guaranteed to find the best boiled peanuts around!

      Boiled Peanuts


If you’ve never stopped at a roadside farmer’s market, it’s time to you give it a try! You have no idea what you’ve been missing!!


local honey


I’d like to send a special “Thank you!” to our local market, Bob & Lisa’s for always offering great food as well as great kitchen and garden advice! 

To celebrate the first day of April here are some fresh strawberries for you! Well, printable strawberries and a bonus printable calendar!

April Collection


April Calendar


Download your April printable collection here!

Or, if you’re interested in purchasing the strawberry artwork included in the printable collection, pop over to my Etsy shop here!

See you soon!

Designing With Texture

Designing with texture is a great way to put your personal touch in your homes design. You can use it to add formality, elegance, rustic whimsy, or soft coziness to any room. I love to find unique ways to add texture when planning a room redesign. Come along and find lots of inspiration for your next design project.


Here’s a great example of layering textures from Emily, over at Jones Design Co.

Jones Design Company

In a room full of neutral shades she uses warm wood shingles and cool stone for the fireplace on one side of the room and carries the textures to the seating area using the checked wool blanket, as well as both the fur and leather pillows. ( Check out Emily’s blog here! Be sure to take a look at sweet Audrey’s room while you’re there!


This precious dining room from Coco at The Crowned Goat is loaded is subtle textures.

Dining-Room-Refresh-The-Crowned-Goat-070915-7

From the mismatched chair shapes, to the chippy china hutch and industrial shelving unit to the sleek iron chandelier and soft lace curtains, this dining room has added interest on every surface. (See more of Coco’s great ideas here along with her beautiful furniture renovations and creations!)


For Donna, over at Funky Junk Interiors, designing with texture is the cornerstone of every room! But, I have to say this gorgeous bedroom is absolutely my favorite.

Funky Junk InteriorsWhere do I start? It’s genius how she’s incorporated everything from barbed wire and weathered wood to a teapot and faux greenery to create a clean and cohesive overall look! (Check out Donna’s blog here and be sure to keep an eye out for all of her amazing, hand created signs!)


Don’t forget the walls when adding texture to your room design!

Gallery Wall

Sneak a little extra depth to a gallery with some taxidermy (faux or otherwise), 3D letters, or an ornate, chunky, frame! (See the original Gallery Wall Post here!)


What sort of elements do you like to use to add a bit of texture to your designs? I’d love for you to share!


Quick Fix!

This past Christmas I upgraded my little hand mixer to a stand mixer (yipee!!) and, as much I love it, I had no idea how crazy heavy it would be.  So far, I’ve been using it once or twice a week so until that changes, it will stay on top of the counter. Since it’s so heavy, I thought it would be nice to be able to “slide” it back and forth. Here’s my simple project to make that happen! (And . . . some fun news!)


Mixer Quick Fix


Using a sheet of felt, a cheap (Ikea) cutting board and some double sided tape (I’ll explain that later) I whipped together a solution in no time!


Mixer Quick Fix 3


The felt is a basic, craft, felt and I trimmed about an inch off of one end so that it wouldn’t hand over the handle hole. Then I used plain old, double sided Scotch tape to attach it to the back side of my cutting board. Originally, I was was going to glue the felt down but I decided to use the tape instead so that I could easily peal off the felt and pop it in the dishwasher from time to time. The weight of the mixer is plenty to hold it in place. Now I can easily slide it back and forth across the counter and the white cutting board barely shows.

I know it’s silly, but I love it when a simple (and cheap!) fix makes things work so much more smoothly, don’t you?


Mixer Quick Fix 2


I imagine this would work well for other kitchen appliances as well. If you’ve been looking for a similar solution, I hope this helps!

And . .  .

A while back I received an invitation that is truly squeal worthy! I’ve been invited to join a group of talented bloggers to be part of the Country Chic blog squad! Country Chic Paint produces paint that is both high-end and eco-friendly, as well as other accessories and products for a multitude of home and furniture projects. I’ve been planning new projects using the amazing products they’ve sent and I’ll be sharing them soon!


Country Chic


See you soon!

D I Y   S h o p