White Tulip Designs » Inspiration, Design, and DIY for all of life's events.

Masthead header

Rope Swing

So excited to share a new project today. We’ve been working in the yard for weeks now on different projects and in the process G and I found the perfect tree for a rope swing! I’ve been making these for years and donating them to school fairs, etc. Now we finally have one in our yard. Yipee!

Supplies -

  • Wooden Round (like this)
  • Wood for braces (mine is oak)
  • Hole saw or drill with large bit
  • Extra strength rope
  • Primer
  • Paint colors (for watermelon you’ll need dark pink, red, light, medium, and dark green)

Rope Swing from White Tulip Designs


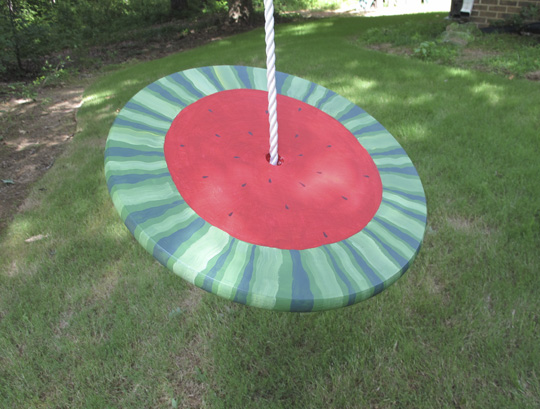
You want to start by finding the center of your round to drill the hole for your rope. Now, find the grain of where your wooden round was glued together.  Then you’ll nail the brace pieces across the grain to give it extra support. If you like the watermelon, it’s super easy to paint. Even if you don’t do a lot of craft painting. See here:


To Paint:

  • Paint the entire piece with primer (I use Kilz) it helps your swing last longer by sealing the wood
  • Sketch out a large circle (I like the free hand look) leaving a border of around 3 inches for the “rind”
  • Paint in the center of your “melon” with a mix of dark pink and red
  • Now the outside border gets a coat of the medium (grass) green
  • Add varying wide and narrow stripes of the light (mint) green
  • Using the darkest green, add a wedge/stripe between almost every stripe of the light green
  • To finish the slice add in your “seeds”.  I sketched mine in pencil first to make sure they were spaced right then filled them in in permanent marker.
  • Let swing dry/cure overnight. Finish with a coat of sealer. (Let it dry 2 days before you hang.)


Watermelon Rope Swing


Hanging the swing:

We started the process by finding a tall, sturdy tree with a fairly thick branch that was really high off the ground.

Then, we tied a long length (approximately 50 feet) of scrap rope from another project to a piece of scrap wood. At this point Hubbs was at work so G and I attempted to throw it over our chosen limb. Let’s just say I’m really glad the footage hasn’t show up on Youtube. So, we had to wait to get Hubbs to throw our test wood over the branch and, of course, he landed it on the first try.

When we were ready to hang the real thing we used the test rope to pull the new rope back over the limb. I drilled a hole into the side of the tree to screw in a large hook to catch the swing when it’s not in use. I tied off the sing below the hook to keep it from shimmying up the tree while kids are swinging on it.


Rope Swing       5 -Swing

Make sure the swing sits pretty high when you first tie it off. The first swing will settle it into place much lower. Ours was around 4 feet off the ground at first. Luckily G is a bit of an acrobat. The swing itself will need a good strong knot on the underside to make sure it doesn’t slide off.


Watermelon Rope Swing from White Tulip Designs


G started off by explaining to me how he was too “mature” for a rope swing. Now he’s loving it (and so am I!) I really wish we had done this sooner. Better late than never!


Don’t forget to stop by tomorrow for Saturday Style!

 Watermelon Rope Swing Feature

Linking up at Met Monday, Wow Us Wednesday, & The Scoop

[…] Wonderful DIY project the whole family can enjoy. (Tutorial via White Tulip Designs) […]

Jennifer (White Tulip Designs) - 08/03/2015 - 9:10 am

Thanks! Absolutely!

Lou Lou Girls - 08/02/2015 - 5:48 pm

I absolutely love this! Pinned and tweeted. Thank you so much for bringing such a masterpiece to our party. I hope to see you tomorrow at 7 pm. We can’t wait to party with you! Lou Lou Girls

Jennifer (White Tulip Designs) - 07/27/2015 - 3:24 pm

Hi Sylvia, yes it is the 18″ round. I’ve done them for school auctions before and I normally do the smaller round. For our house, though I wanted it to be big enough that adults could swing on it and be comfortable. The kids love it and when we have over families over it’s fun that the adults can get out and swing with the kids.

Thanks for stopping by!

SYLVIA HAMM - 07/27/2015 - 12:59 pm

I love the watermelon design. This would be perfect for boys and girls. Did you use the 18″ round piece from Home Depot? I have used them for other projects but thought they would be too big for the round swing. Yours certainly doesn’t look too big.

[…] See it HERE! […]

[…] Watermelon Tree Swing: If this doesn’t just scream summer, we don’t know what will. (via White Tulip […]

Jennifer (White Tulip Designs) - 06/17/2015 - 9:53 am

Thank you Carole! I’m so glad you stopped by!

Carole West @ Garden Up Green - 06/17/2015 - 8:56 am

This project is super cool. Really like it and appears pretty easy to make. Thanks!
Carole

Jennifer (White Tulip Designs) - 06/15/2015 - 2:38 pm

Thank you, I’m so glad to have you! When you get one up feel free to link it to my Facebook page!

Nina Lewis - 06/15/2015 - 1:28 pm

Am dropping by from the Something to Talk About link party. What an adorable idea!! I’m now looking at our trees trying to figure out where I can put one of these.

Thanks for sharing!!

Best,
Nina

Classic Broccoli Salad

Mmmmm . . . . don’t you just love a fresh mixed broccoli salad? There are lots of different variations but when I was a child this is the one my Aunt DeThane used to bring to our family get-togethers. It ended up being passed around and now it’s one of my Hubby’s favorites. It’s a great recipe to prep the parts and throw together at the last minute to help it stay crisp and fresh. However, after the leftovers marinate in the dressing overnight it’s not too pretty to look at but it’s pretty darn yummy then too!


Broccoli Salad - White Tulip Designs


Broccoli Salad
Serves 6
Write a review
Print
Prep Time
30 min
Prep Time
30 min
Ingredients
  1. 4-5 cups Broccoli (fresh chopped florets)
  2. 2 cups Cauliflower (chopped)
  3. 1/2 cup Red Onion (chopped into small pieces)
  4. 1 cup Cheddar Cheese (shredded)
  5. 5-6 pieces Bacon (crumbled into small pieces)
Dressing
  1. 1/2 cup Sugar
  2. 1/4 cup Red Wine
  3. 1 cup Mayonnaise (I use Duke's lite)
Instructions
  1. Mix all ingredients for the dressing, whisk together and set aside. (This will give the sugar a chance to break down so the dressing will have a smooth texture.)
  2. Chop all of the veggies and mix them together, by hand, in a large bowl. Now chop your bacon into small, dime to nickel sized pieces. If you rinsed, make sure your dry it well first. Now mix pieces into your salad.
  3. Add shredded cheese and stir dressing into your salad just before serving to keep veggies more crunchy.
  4. This is great to make ahead for family dinners. Be sure to seal the dressing in an airtight container and refrigerate separately from the mixed veggies.
  5. Enjoy!
Notes
  1. *Want your bacon to add less grease to your salad? Place cooked, whole pieces into a metal strainer and rinse under hot water for a few minutes. Lay on paper towels to dry while prepping your vegetables.
White Tulip Designs https://www.whitetulipdesigns.com/

 Broccoli Salad - White Tulip DesignsBrocc Salad 4Brocc Salad 6

 If you’re new to this recipe I suggest giving the dressing a little taste (using a piece of broccoli or cauliflower) and alter the amount of sugar, vinegar, or mayo to your taste. And, whatever you do, do not substitute balsamic, or apple for the red wine vinegar. (I’ve had people ask me about that before.)

FYI - Don’t forget you can print the recipe right from the card above!

What’s your favorite summer recipe?

 Linking up at Met Monday, The Scoop, Wow Us Wednesday

Jennifer (White Tulip Designs) - 07/20/2015 - 6:01 pm

Thank you ladies! I’ll be there for sure!

Lou Lou Girls - 07/20/2015 - 3:22 pm

I’m loving this! Pinned and tweeted! I always love your creations, thanks for sharing this with us at our party! I hope to see you tonight at 7 pm, we love seeing what you have been working on! Lou Lou Girls

Welcome to the Neighborhood

Good morning! Summer is kicking off with a blast. Hope you had a wonderful first weekend. We kicked things off by celebrating National Doughnut Day (shameful, I know) and worked on some new projects and finally, all 3 of us started work on new seating area for the front yard with a few projects that I’ll be sharing soon.           

I love how this time of year seems to bring everyone outside to walk through the neighborhood. We live at the far end of ours and I always feel so bad when new folks come walking through and I find out that they’ve been part of our little corner of the world for more than just a few months. It seems like we get so busy with life that we completely miss the new families as they come in.

One of my friends and I were discussing the new additions to our respective neighborhoods the other day. It’s always a little sad to see friends move on but it’s also nice to meet new families and make new friends. I’m not always the best at stepping out to introduce myself when new folks move in (I’m sort of shy like that) but I’m trying to be better about welcoming newcomers.

Wouldn’t it be great to have a little something in your back pocket for when new neighbors move in to make it both quick, easy, and friendly and welcoming? So, I put together this printable that you can edit yourself, with your own community’s information, and have on hand to print as needed.


Welcome Basket printable from White Tulip Designs

The printable includes spaces to add lots of local suggestions to help feel at home. And, even if you don’t eat ice cream, for example, you probably know where everyone likes to go. At the very least it’s a nice way to help newcomers get out and explore the area. Not to mention, chances are pretty good that if you show up while they are still unpacking they won’t have time for much of a chat.


Welcome Basket printable from White Tulip Designs    Welcome Basket printable from White Tulip Designs


It’s a great way to personalize is friendly housewarming gift. Simply, put together a quick housewarming basket with and easy breakfast or dessert ingredients that can easily be put together without too many utensils, or too much time. Strawberry shortcake is another favorite. No need to go overboard but remember lots of folks have nut and other allergies, so keep it pretty simple.


Welcome Basket printable from White Tulip Designs


All you need to do is download the printable file, save it to your computer and open it in Acrobat Reader. From Acrobat Reader you can edit all of the included field with your own information. Now you’ll want to save the updated file, print and fold (no cutting or trimming necessary.)

 Housewarming Welcome printable from White Tulip Designs


Download the printable here and open in Acrobat Reader to edit the fields with your own information:

Click Here: Welcome Home - printable

You may print as many as you like but remember the Welcome Home printable is for personal use only. - Thanks!

Don’t have Adobe Reader? (Download free Adobe reader here!)


If you’ve missed any of the Saturday Style post from the last few weeks click here!


Linking up at The Scoop, Wow Us Wednesday, and Met Monday


Featured at Home Matters Linky Party


Jennifer (White Tulip Designs) - 07/29/2015 - 10:56 pm

I’m so glad you like it! Thanks for stopping by!

Maria - 07/28/2015 - 8:44 pm

This printable comes just in time! I have new neighbors next door and have been meaning to give them a proper welcome to our neighborhood, and your printable is perfect! Thank you so much for sharing this, Jennifer! It’s already saved and edited on my computer. Hope you have a great rest of the week!

[…] See it HERE! […]

Jennifer (White Tulip Designs) - 06/26/2015 - 9:47 am

Thank you Alayna! I’m so glad you stopped by!

Jennifer (White Tulip Designs) - 06/26/2015 - 9:46 am

Thank you so much! I love linking up with Home Matters!

Alayna @AlaynasCreations - 06/26/2015 - 8:53 am

Adorable idea. A gift like this would be so reat to receive when moving into a new neighborhood.

Hi, Jennifer! We wanted you to know that we LOVED this so much when you linked it up to the #HomeMattersParty last week…we FEATURED it THIS week! Come by and check it out if you have a chance 🙂 Happy Friday! http://theroadtodomestication.com/2015/06/26/home-matters-linky-party-43/

[…] Welcome to the Neighborhood from Jennifer @ White Tulip Designs […]

Jennifer (White Tulip Designs) - 06/22/2015 - 8:12 am

Thank you Kathleen!

Jennifer (White Tulip Designs) - 06/22/2015 - 8:10 am

Thank you so much! You have a wonderful group of blogs linking in. I look forward to it!

Kathleen - 06/22/2015 - 2:51 am

That is a very pretty printable, thanks for bringing it to the #HomeMattersParty
Kathleen

Lorelai @ Life With Lorelai - 06/21/2015 - 11:43 pm

Oh, my gosh, I LOVE this idea! What a fantastic “Welcome to the Neighborhood” idea. Your printable is beautiful. Thanks for sharing at the #HomeMattersParty - we love partying with you! Hope to see you next Friday. 🙂

~Lorelai
Life With Lorelai

Jennifer (White Tulip Designs) - 06/19/2015 - 10:32 am

Thank you Vicki!

Vicki and Jennifer 2 Bees in a Pod - 06/18/2015 - 8:55 pm

Jennifer - this is so sweet. Wish you were our neighbor 🙂 Thanks for sharing with us at Something To Talk About Link Party!

Boho Chic Guestroom - Saturday Style

Are you visiting friends or family this summer? Or, maybe you’re hosting your own little house party. At any rate, here is a laid back Boho-Chic guestroom inspiration board that includes everything from the rug and bedding to a green glass water carafe for a late night sip. I love the warm, comfy style of the Boho Chic look and I think its a fantastic choice for an inviting guestroom.


 For more Saturday Style click here!

 I’m linking up at Wow Us Wednesday, Met Monday,    


.

 
Jennifer (White Tulip Designs) - 06/16/2015 - 8:33 am

Thank you, Melissa!

Melissa Vera - 06/15/2015 - 9:20 pm

I so need to refresh my guest room. Thank you for linking up at #HomeMattersParty this week. I hope you will come back next week to link up again.

Enjoy the Journey

Well, it’s official. I’m the Mom of a high school student. (I choke on that a little every time I say it.) Folks, he blossomed. Awkward age, what? Don’t get me wrong he’s still a teen. And, bless his heart, he hasn’t caught up in the height department but Middle School was a wonderful experience. Of course, he was lucky enough to be in a school with teachers who really cared about students. But, if your babies haven’t hit Middle School yet, never fear, it’s not always as bad as people will tell you.  I had people tell me such awful things, I was terrified.


Happy Summer - new beginnings


Next school year he has decided to focus on more creative classes and will be taking his first art class since elementary school. I’m so excited! He says he wants to pursue an artistic career and I’m hoping he’ll stick with it. I really want him to enjoy it like I do.

This summer he’s going to be helping out with blog projects and some of my social media (he’s been telling all of his friends about his summer “job”).  I’m so excited about sharing how all of these things work and what I do. It’s so weird to think that nothing about my job from my Etsy shop to the blog was even possible as a job when I was his age. Makes me think about the possibilities for his generation, right?

Today, we’re set out a plan for our summer together. It makes me really smile to think about the journey he’s about to begin. I can’t wait to meet the amazing young man that he’ll become!


A New Beginning


I hope you have a wonderful summer! Enjoy your journey!


D I Y   S h o p