
.jpg)
Holy Wow, this week flew by! I’ve been planning a mini-party for G’s birthday party Saturday and my head is spinning a bit. It’s just a small family gathering but I really want it to be special. Hopefully it will come together as planned. (I may be sharing bloopers on Instagram, if not! LOL!)
I put this project together to have something unique but personal to hang in our living room. I’ve been trying to pull together as much artwork that’s fun and interesting as possible while I’ve been updating the walls. It pulls together different watercolor techniques and funky tricks to get a neat result. I promise it’s not difficult and it’s really forgiving but it is a bit time consuming.
To start with, I paid $2 for this Volume of Encyclopedia Britannica from 1967 that I found at my favorite junk/estate store, Shinola (read: treasure chest!) So, with that in mind, don’t be surprised if you see many more book page projects in the future!
Ready!? Here we go . . .
Tools:
- Watercolors - you’ll want to use tubes (I use Reeves)
- Brushes - 1 flat and wide and 1 round (whatever size you’re comfortable with)
* Don’t use your better brushes here and don’t use your regular watercolor palette, if you have one. - Cooking Oil - 2 tablespoons (approximately)
- Water - 1/3 cup (approximately)
- Cookie sheet
- Drying rack (anything that will allow air to pass underneath without leaving an impression)
- Book page (I would not use a super delicate, older, book as it may not stand up to the process)
Process:
- Carefully cut page from your book using an Exacto knife. (See tips for creating your outline below.)
- Print an outlined letter (or shape) onto your book page.
- Using a white crayon, trace and color in your letter. (It’s tough to see so take your time and use good lighting for this part.)
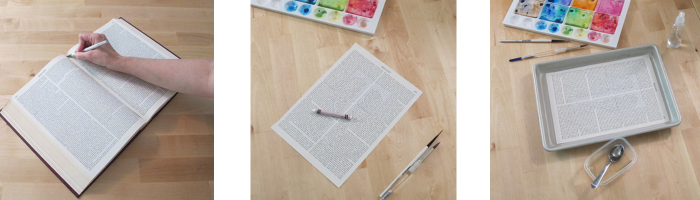
- Place your colored book page in a shallow pan. I used a 1/4 size cookie sheet.
- Start by dripping watercolors with more pigment than color. (Be sure to use colors that mix well or you’ll end up with dirty water.) Then drip small drops of oil (cooking) over the page.
- Using a flat, wide brush tipped with small dabs of undiluted watercolors pull stripes evenly from top to bottom. This will make sure you get color disbursed all over your page. I poured a small amount (about 1/3 cup) of water over the page after that to help keep a random look.

- Place paper towels or newspaper under a drying rack to keep from staining your work surface. Holding the top two corners of your page, carefully slide your page out of the pan and carefully lay it onto your drying rack.
- Using a paper towel, carefully dab to pull excess water and oil from the page. At this point, I went back over the edges with a brush loaded with undiluted watercolors to highlight the edges of my letter.
- Let dry for about 2 hours.
- I used cotton swabs to rub over the letter. This wipes away any watercolor or oil residue and cleans up the lines. Then I went back over the outside with regular watercolors to help make the letter pop.
- Let your letter finish drying for about 2-3 more hours and you’re ready to frame!
Tips to create your printable:
- Open Word and select the “Page Layout” tab at the top.
- Select the “Size” option and choose the size of your book page (or the next size smaller). Then, select the “Margins” option and choose a 1″ margin for all four sides.
- Go back to the “Home” tab and scroll through until you find the font you’d like to use. I’m using DecoCaps. The size only goes up to 72 but you can highlight that box and type in the size you’d like to use. I suggest increasing the size in increments of 100 until you find the size you like. (Mine is 400).
- Highlight the letter and go the “Font” box at the top. Select the “Text Effects” option then scroll down to the Outline option and slide over to the color bar to choose a medium gray option.
- Go back to the “Font” box at the top and select the “Font Color” option. Choose white for your fill color. (Be sure to keep your letter highlighted through the entire process.) You may want to tweak your margins a bit before you print so do a test print on plain paper first.
- Now you have a highlighted letter!
Whew, Fun, right? Now, go forth and paint my friends. Have a lovely weekend! See you next week.
Linking up at The Scoop, Metamorphosis Monday, & Wow Us Wednesday


Jennifer (White Tulip Designs)
Oh, you’re a girl after my own heart! You’d love the “Geek Chic” sign I made for my hubby!
Thank you Julie, I’m glad you stopped by!I’m so happy you liked it!
That is so pretty… no beautiful. It looks as if it belongs in an elve’s house in Middle Earth.
I remember doing watercolour resist painting like this at primary school, well, when I say like this I mean technique only! Your results are so sophisticated. I think this is a beautiful effect and an interesting new way to make book art. Lovely!
Wow! That looks incredible. I’m so impressed. Pinned and tweeted. We appreciate you stopping by to party with us. We hope to see you, tonight at 7 pm. Happy Monday! Lou Lou Girls
Hi Christine, Thanks for stopping by!
This is absolutely beautiful, Jennifer! Thank you for the tutorial! Pinning!
Christine
Thank you! I’m so glad you like it!
beautiful. wow.
b
Jennifer - you are so very creative. We too love book page art but you have taken yours to the next level! Thanks so much for sharing with us at Something To Talk About Link Party!
Love it! So pretty and unique!
Thanks so much for sharing on Something to Talk About! Pinning!
Karen