White Tulip Designs » Inspiration, Design, and DIY for all of life's events.

Masthead header

Quick Fix - Designer Paper

Confession time, I have a bit of an addiction to designer papers. We won’t discuss how pricey these beautiful sheets of happy are, or the fact that when I purchase them I rarely have any idea what I’ll use them for. (Much like my random fabrics collection.) I may need an intervention soon. Any-whoo, when I was putting the final touches on my home office corner I thought it would be a nice spot to display some of my collection.

Paper Keeper

You don’t want to add tape or clips to this paper as it can cause damage.  So, I had seen some ideas on Pinterest and put together an idea that works a bit better for me.

Paper Keeper 1

1. Collect a few toilet paper rolls/tubes and 1 paper towel (or wrapping paper) roll for each sheet of paper.

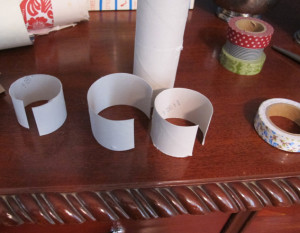
2. Slice toilet paper rolls down the center and divide into 3 bands.

3. Carefully roll your paper sheet around the longer cardboard tube, keeping the tube centered.

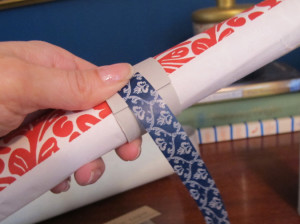
4. Place your toilet paper band around the waist of your rolled paper. Hold in place with washi tape or other masking tape.

Paper Keeper 2

Are you on the hunt for some amazing designer papers? Here are some of my favorite shops:


Decadent Mac & Cheese

One of the first dishes I learned to make from scratch was my Grandmother’s macaroni and cheese.  We were very close and it’s always been such a nice memory. It was a fairly standard, old-fashioned recipe and was full of eggs, butter, and cheese aka - truck loads of fat and calories!! In the last few years I’ve been considering trying to update the recipe. Hubby and I love the multi-cheese options served in nicer steak houses so I thought I’d look into concocting something similar.

Decadent Mac & Cheese cover

After much research and review of several websites, magazine articles and cookbooks, I put together a recipe that works really well and G loves it! The “cheese guy” at Publix spent about 30 minutes helping me choose flavors. (Yes, it was just as weird as it sounds.)

This isn’t a particularly difficult recipe but it’s not quick, for sure. I try to prep some of the ingredients a day or so ahead to save time putting it together on a school night. I go ahead and boil the noodles, grate the cheeses and pre-measure the dry ingredients (the flour and red pepper can be stored together). Unfortunately, it’s fairly expensive either because of the cheeses. But, the leftover cheese does keep really well for long periods and the leftovers freeze like a dream.

Printable recipe card here!

Ingredients:

  •   16 oz. Box of Rigate or Penne pasta
  •   3 cups Med. Sharp Cheddar Cheese -shredded
  •   1 cup Smoked Gouda - shredded
  •   1 cup Gruyere - shredded
  •   ÂĽ tsp. Paprika
  •   ½ cup Butter
  •   ½ cup Flour
  •   3 cups Milk
  •   1/3- ½ cup Panko Breadcrumbs (I prefer seasoned)
  •   2 tbsp. Parmigiano-Reggiano (grated fine)

**Note: The Parmigiano-Reggiano will add all the salty flavor you’ll need. If you choose to use regular Parmesan instead you’ll want to add a pinch of table salt to the topping mix.**

Decadent Mac & Cheese 7Decadent Mac & Cheese 5

Prepare pasta according to package directions. (Be sure to add salt, to taste, to the water when boiling) Grease bottom of large glass or ceramic dish (9×13) with 1 tbsp butter.

Preheat oven to 350°.

Melt butter in a heavy pot oven over low heat. Slowly whisk in flour and red pepper until smooth (about 2 minutes).

Decadent Mac & Cheese 6Decadent Mac & Cheese 4

Increase heat to medium. Gradually whisk in milk (1 cup at a time). Continue whisking until thickened (approximately 6 minutes). Remove from heat.

Mix together Cheddar, Gouda, and Gruyere cheeses in a medium bowl. Set aside 1 cup of mixture for topping. Add cheese mixture to sauce mixing until smooth and all cheese is melted. Add in pasta 1 spoonful at a time, tossing to coat.

Decadent Mac & Cheese 3Decadent Mac & Cheese 2

Spoon mixture into buttered baking dish. Top with reserved cheese mixture.

Mix together breadcrumbs and Parmigiano-Reggiano sprinkle over top. I prefer to use less breadcrumbs as a thicker layer doesn’t get a toasty.

Bake at 350° for 40-45 minutes. (If you like the top a little more crunchy turn on the broiler for the last 3-4 minutes.)

Enjoy!!


Decadent Mac & Cheese 1


Decadent Mac & Cheese can be easily frozen for up to 2 months. (Notes on freezing coming soon!)

Click HERE for printable recipe card!


Linking up over at Wow us Wednesday, Met Monday,


Jennifer (White Tulip Studio) - 04/09/2021 - 7:47 am

Thank you Joy! I take that as a big compliment coming from you!

Joy @ Yesterfood - 04/08/2021 - 5:03 pm

Oh, this looks amazing, Jennifer! You used all my favorite cheeses. Is there anything better than a beautiful homemade mac and cheese? I don’t think so. Thank you for sharing this with us at Treasure Box Tuesday- pinned and tweeted! 🙂

Jennifer (White Tulip Studio) - 03/03/2021 - 4:16 pm

Thanks! You’re welcome!

April - 03/03/2021 - 3:38 pm

We love mac and cheese! This looks like an awesome recipe for us to try. Thanks for sharing.

Laundry Room Storage Ideas

Laundry Room Round Up


I’ve planning (more like plotting) a laundry room update for a while now. So, I’ve been scouring the net and Pinning my fingers off looking for great DIY and storage ideas. Have you been dreaming of a new space to fluff and fold? Here’s a great round-up of ideas and inspiration . . .


Laundry Room Round-up


I’m loving the DIY floating shelves from Four Generations, One Roof! It makes everything have a such a sleek, put together look.


Laundry Room Round-up


Basket love from Kirsten Danielle Design! The trim detail seems really hot right now.


Laundry Room Update


From the rustic sign down to the adorable wire basket this laundry closet from 2 Bees in a Pod is to die for!! Amazing way to make the most out of a small space with attention to every detail.


Laundry Room Round UP


The bright yellow makes this laundry room from Savvy Southern Style look like a place you’d want to spend more time in. And the addition of the adorable folding table and stool are perfect for it!


Laundry Room Round-Up


This laundry room over on From My Porch To Yours is dreamy. Adding the chandelier is absolute genius.


Laundry Room Round-up


Great, behind the door idea from Thrifty & Chic! I’m so going to try this for storage in my new laundry room.

Stay tuned for the final reveal of my new laundry room coming soon! In the meantime, stop by my Hometalk or Pinterest boards for more laundry room inspiration and ideas!

Follow White Tulip Designs’s board Laundry on Pinterest.

Monogram Pillow

I know, silly right? I found this adorable traffic fabric at the Lobby and snatched it up not even where I would use it. I was thinking about using for a pillow since I’ve trying to make our living room more casual for quite a while.  After I put the pillow cover together it still needed a little something and the overall car motif made it look a little like it belonged in a nursery. So, I decided to add a darker color element with the “T”, see?

T PillowT Pillow 2

Cute, right?  This definitely adds more fun to the whole room.


T Pillow 4      T Pillow 3

I just used the iron on transfer paper (the directions are included) and drew out my “T” on it. (I used Pellon’s EZ Steam)  Then I attached the paper to the front side of the paisley fabric and trimmed around my “T”.  Finally I ironed it in place. Directions are included. It’s such a great way to make a more casual statement. Easy peasy!

T Pillow main

* This post includes affiliate links.

Jennifer (White Tulip Studio) - 03/03/2021 - 10:34 am

Thank you! I’ll be there for sure!

Lou Lou Girls - 03/02/2021 - 3:37 pm

This looks so amazing. Pinned and tweeted. We love to party with you, so I hope to see you tonight at 7 pm.. Have an amazing day! Lou Lou Girls

New Window Panes

Ok, this may be more of a do as I say, not do as I do tutorial.  I started off by opening the large window in the back of our living room by adding simple curtains hung high on the wall and taking out the blinds. The new light is amazing!! But the windows needed a little something. So, I had seen several tutorials around the internet but (like an idiot) decided I could work it out on my own. This is where I started . . .


Window 1      Window 2

I used a dry erase marker to mark and draw guidelines. This is definitely a do-NOT-do. You’ll want to work out where you want your grid lines to go, of course, but this just doesn’t work well at all.


Window 5

I used 3M white vinyl electrical tape for my grid lines. And, what I didn’t count on, the vinyl is a bit stretchy so it makes following drawn lines basically impossible. I figured out pretty quickly a better way to do it. First measure where the lines should go across the top and on the side. Unroll a little more length than you’ll need as this will keep from stretching it while you put it in place. Then, carefully lay the line in place letting it fall straight before you press it in. The horizontal lines are a bit more difficult and I found that laying in one section at a time helps.


Window 7Window 8

I used my thumbnail to be sure to wiggle the line into place as needed and once the lines were good and straight I used a rubber spatula to squeegee out any air-bubbles.  Ahhh, one more project done and done.


DIY window panes


FYI- I have decided to continue this on our other windows in the front of the house but I plan to create a template to make it go much faster. I’ll let you know how it goes!

* This post contains affiliate links.

-update: Hop over and see Deb’s windows, over at Seeking Lavender, turned out!


Linking up over at WOW us Wednesday ,  Metamorphosis Monday and  The Scoop!


Jennifer (White Tulip Studio) - 03/30/2015 - 8:34 pm

Thank you! I’m hopping over now!

Lou Lou Girls - 03/30/2015 - 4:29 pm

This looks so incredible! Loving it! Pinned and tweeted. Thanks for being a part of our party. I hope to see you tonight at 7. Lou Lou Girls

Jennifer (White Tulip Studio) - 03/26/2015 - 9:33 pm

Thank you! I’ll be there!

Christie - 03/26/2015 - 2:02 pm

Thanks for sharing this awesome post at Totally Terrific Tuesday Link Party. If you haven’t linked up this week, be sure to stop by. The party is still going on! Enjoy the rest of your week!
Christie ~ Sparkles of Sunshine

Jennifer (White Tulip Studio) - 03/25/2015 - 8:26 am

Thank you for hosting!

Barb @ A Life in Balance - 03/24/2015 - 8:06 pm

Thank you for contributing to Motivation Monday!

Jennifer (White Tulip Studio) - 02/25/2015 - 11:16 pm

Hi Deb,
Thanks for stopping by! I got mine from Amazon (the hot link will take you to the tape that I ordered). It’s the same thing as the black electrical tape that you can find just about anywhere but I had a tough time finding the white for the windows.

Deb - 02/25/2015 - 9:55 pm

Genius! I have been trying to figure out an easy way to do something similar to my windows at home. Where can I get this tape? Pinning!

Deb
@Seeking Lavender Lane

D I Y   S h o p