
A while back I created a set of sturdy and cute little shopping bags to take help reduce the number of plastic bags in our house. It was a bit of an adventure but they did turn out quite nicely, if I may say so myself. (see previous post here) However, I was afraid that including a tutorial might result in tears, mostly from me.
Since then I’ve gotten some of the sweetest comments and compliments from the kind folks at my grocery store. But I still keep ending up with tons of plastic bags we’ll never be able to re-use. So, this weekend I whipped up a new one that’s specifically made to hold produce.
When I was poking around all over the net looking bags in general I kept finding cute t-shirt bags. I couldn’t find a tutorial that looked quite like what I had in mind so I decided to plunge in an make my own. And it worked!!
.jpg)
Supplies:
- T-shirt
- Scrap fabric
- Ribbon (I suggest grosgrain or cotton)
I started with a barely worn, heavy weight t-shirt from the thrift store and some left-over fabric from the other bags.
Trim the top off the t-shirt by cutting a straight line from the middle of one sleeve to the other. Using a straight line at an angle, cut the remaining of the sleeve away from the body of the t-shirt.
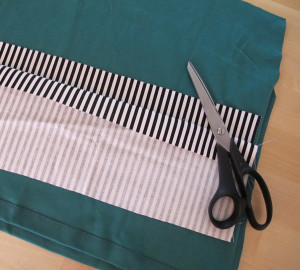
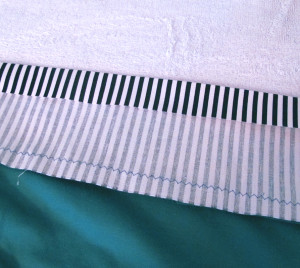
Measure 2 panels of fabric, 5inches by the width of the t-shirt (the top area where you cut off the neck). Sew panels (right side facing) to the top/cut portion of the t-shirt.

Sew down the “V” on either side of the tote. Then, fold over the top edge of the fabric about an inch and sew down with a straight stitch. I ironed mine down before pinning to keep it straight.
Cut 2 small slits about 1/2 inch apart, in the bottom hem of the t-shirt. Now, cut a strip from the remaining top portion of the t-shirt and thread it all the way through the bottom hem. Tie the strip together in a tight knot and cut the remaining ribbons to tuck the knot into the t-shirt.
Measure 2 pieces of ribbon measuring twice as wide as the bag plus about 6-8 inches. Thread each ribbon through one side of the top then back through the other being sure to thread each piece in opposite directions. Tie each ribbon and sew it down to keep it from pulling apart.
The perfect addition to my little collection! I can’t wait to use it!
Here’s the first diy tote post!
Linking up at Met Monday,


Jennifer (White Tulip Designs)
Thank you ladies!
Hey Jennifer - We forgot to let you know how much we LOVE your DIY Market Tote. We’ve bookmarked this to try making some for ourselves! You’re so creative and energetic. We’ve just Pinned this to our link party board! Great job!
This looks amazing! You are so talented. Pinned and tweeted. Thanks for being a part of our party. I hope to see you on Monday at 7 pm. Happy Easter! Lou Lou Girls
Thank you Pamela! I love using these. It’s amazing how much easier it is unloading the groceries too!
Great idea! I love using the cloth bags. They are so much niver than all that plastic. They hold more and stand up better in the car. Thanks for the tutorial so I can make some of my own. I am visiting from LouLou Girls.